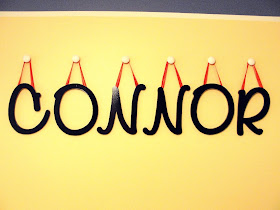
 So maybe my baby is just about 6 months old now and these letters have been up for over 6 months. It's better to be late than to never post this, right?
How can you have a nursery without the wall letters these days? I hate doing things that are super trendy, but I really wanted the letters and came up with a hanging method that's pretty unique. This project was a combined effort from Hubby and I and it was really fun to work on a craft together!
Please forgive me for not taking the time to Photoshop these properly. I'm a graphic designer by day and don't have the energy or motivation to use it even more at night. The color is slightly off! The letters are actually navy blue with bright red ribbon, but they look more like black with orange/red ribbon.
So I (well, Hubby did it since he wouldn't let me near spray paint while I was pregnant) started out by spray painting the letters. Like our little cardboard spray paint work area? I had a few more projects I was also working on at the time. Hubby got really into helping with this, so he made those thin wood strips and covered them in painter's tape. He decided it would be easier to make sure the whole letter got painted by having the propped up.
 Now comes the complicated part...
I wanted to hang the letters on something, but nails or thumbtacks just seemed too boring and wouldn't fit with the room. I'm so proud that I came up with this idea of using drawer knobs and it actually worked! With some help from Hubby and Kitty, we figured out a way to make this work.

We bought 6 drawer knobs from the store. But if you look at the hardware that comes with knobs, the screws are flat on one side because they sit inside a drawer. In this case, that wouldn't work for the wall. We found these long pieces that look like screws, but they don't have a top or pointy bottom. We cut them into smaller pieces to use on the wall.
In order to get the screws into the wall, we used hollow wall anchors on each one. Then the drawer knobs could be screwed into the other side easily.

In order to get the screws into the wall, we used hollow wall anchors on each one. Then the drawer knobs could be screwed into the other side easily.

Time to pull out the laser level Hubby got as a gift a few years ago! This was the perfect excuse to use it and it worked great.

I laid out the letters on the floor so I could measure the distance between each one and then we could match it on the wall.


Love the knobs on the wall! And if you take his name down you can use it to hang other pictures or even clothes!
ReplyDeleteIt's beautiful! My son's name is also Connor :)
ReplyDeleteI'm embarassed to even admit this, but that's what I wanted to do for E's room, but I couldn't figure out how to do the knobs. I'm bookmarking this so next time I'll know how to do it.
ReplyDeleteThat looks so cute and thanks for the step by step. I'm soooo not handy!
These are sooo cute! I love the little knobs they hang from. Adorable
ReplyDeleteJenny
www.simcoestreet.blogspot.com
AWWW, this is super cute!!!! i adore the project!!!
ReplyDeletelove K
This looks a lot easier than the way we did it!!
ReplyDeleteit's like your brain is on crafty all the time!!! You amaze me even finding a way to make them go in the wall. This is where I give up say a few not so good words and the project then goes in the pile of other things I should have done ... lol.
ReplyDeleteLOVE this!
Lisa, Connor is such a lucky little guy!
ReplyDeleteThank you so much for sharing your creativity and talent on “A Little Birdie Told Me…” Tuesday at Rook No. 17! This week’s party is already in full swing. Hope you’ll join us!
Your friend,
Jenn
Looks beautiful and the knobs are genius! Thanks so much for sharing at Taking A Timeout Thursday!
ReplyDeleteSo cute! I love the way this turned out!!
ReplyDelete