Friday, December 14, 2012

Surfing Santa Hawaiian Office Christmas Decorations

I've seen a few different blogs that talked about decorating for the holidays at work.  It's hard to come up with something unique, but still appropriate for work decorations.  At our office, we started a department decorating contest last year, and we all work really hard to be the winning group with a really unique idea.

After many brainstorming sessions, we decided to go with the Tiki Tidings & Surfing Santa theme.  This was a huge labor of love and we spent many, many hours perfecting our design.  I'm so proud of how it turned out!
The surfing Santa is on foam core and hanging from the ceiling.
Santa Seahorse with his sleigh of fish
North Pole Beach with suntanning Santa
Melted snowman hangin' out on the beach...until he melted!
All of the interior aisles with cubes were decorated like this with the sand, water, green fringe, colored lights, and random fish with Santa hats.

Did anyone do anything really creative for their decorations this year?  We already need to start planning for next year!

Tuesday, December 11, 2012

DIY Stuffed Fleece Penguins

Aren't they the cutest? 
 I'm so in love with them!

I can't take credit for this pattern.  I used a book called Wild and Wonderful Fleece Animals by Linda Carr.  The penguin pattern comes in the book and then I enlarged the pattern to make them much bigger.  I also added the glittery silver ribbons around their neck to make them a little more festive.


They're so adorable on by the fireplace for the holidays!


Wednesday, December 5, 2012

DIY Footprint Christmas Ornaments

Since we just finished a Hanukkah Menorah hand print craft, we had to do a Christmas footprint craft for the other half of the family!

This was really simple to do (in the bathtub) and it came out really cute!  I bought some clear plastic ornaments from the craft store and we used acrylic paint for the footprint.  After the footprint dried, I added the mistletoe berries and words with a paint pen. 

On the other side, I wrote his name and the date so we can look back at it every year.  I also made a few extra to give the relatives for gifts this year.

Monday, November 26, 2012

DIY Handprint Hanukkah Menorah

 It's time to begin the winter holiday crafts!  Having Connor around does not make it very easy for me to get crafts done like I used to, but I loved doing this one with him!

It's pretty self-explanatory, so there's not much of a tutorial for it.  I used some blue patterned paper and blue acrylic paint (in the bathtub) to do his hand prints.  After the hand prints dried, I added the yellow flames with a small paintbrush.  You could do this with finger prints too, but that was a little too much for him to handle!
 I added his name and the date so we can pull this out each year to see how his hands have grown. 

 Really easy and a fun craft to do with the kiddos! :)

Monday, November 19, 2012

FREE personalized card!

So who feels overwhelmed now that the holidays are about to start?

:::raises hand:::

Me! Although, I really, really tried to plan ahead and get things done early this year so I don't get too overwhelmed.

Check one thing off your list early with a FREE personalized greeting card from Treat

Maybe you need a card to say thanks for the yummy Thanksgiving meal, to wish a relative a happy birthday, or simply to spread the holiday cheer, Treat lets you create a one-of-a-kind card that will bring smiles to any recipient.

Treat is offering one FREE personalized card good only on Monday 11/19 & Tuesday 11/20 for readers of The Pursuit of Happiness using the code TREATBLOGR.

* * *

Enjoy & have a wonderful Thanksgiving!

Lisa


This post is sponsored by Treat.

Tuesday, November 13, 2012

Reversible Patchwork Coasters

We've been spending a lot of time in Connor's room while he plays and so he can get more comfortable with being in there. For the first year, he pretty much did nothing but sleep in there!  I don't want to ruin the pretty white furniture so I decided to make some little coasters.  (Mommy and Daddy may or may not bring a beer in there every once in awhile!)

I had some extra fabric from the patchwork pillow I made earlier so I decided to make the coasters match.
The coasters are 4" x 4" finished, so I cut the pieces a little bigger for a .25" seam allowance. The back is thick quilted fabric and the front is made from some different fabric swatches.

I sewed the patchwork pieces together.

Then I took a piece of quilted fabric and pinned them with wrong sides together. Just like a pillow, I sewed 3 sides closed and left one open.

I flipped the fabric right side out and then irons all the creases.

I pinned the last edge closed and sewed it on the machine.

Love how they turned out and they match perfectly!

And they're reversible!


Monday, November 12, 2012

Holiday Card Time!

It's that time again!  I'm getting excited and working on ideas for our annual holiday card. As usual, I takes me numerous hours to pick out and perfect our card. :)  As a graphic designer, I'm kind of picky about the design of my cards, but I'm always so impressed by the designs that the Tiny Prints designers come up with. (Umm, can I work there? LOL!)  There's so many great ones that it's hard to choose just one!  And since we celebrate both Hanukkah and Christmas, I always want to find something that I think works well for both holidays and their traditions.

So here I go...off to decide which of these gorgeous holiday cards we should use this year!


 Maybe one of these?


BTW, who wants to pay full price for holiday cards? Not me!  Check out these great promotions and deals here.  Snatch them up before the expire!


This post is sponsored by TinyPrints

Monday, November 5, 2012

Hidden Cauliflower Mac & Cheese

It takes some effort to get Hubby to eat his veggies. He'd prefer french fries as his source of vegetables if he could! I thought this recipe from Jamie Oliver sounded like a great way to add some veggie nutrition to mac & cheese. We were very happy with how it turned out and I didn't feel too bad about pigging out!

Ingredients:
• 1 head of cauliflower
• 8 oz. shredded cheddar cheese
• 4 oz. parmesan cheese
• bunch of parsley
• salt
• 16 oz. macaroni
• 1 cup sour cream

Cut the cauliflower into small florets.   

Finely chop the parsley leaves. 

For the pasta, boil your water in a large pot and then add the macaroni and cauliflower.  Cook according to the pasta directions on the box.

Pour all the shredded cheese into a small saucepan and add the sour cream.  Heat with a low flame and stir every so often until the cheese is smooth and melted.  Add all the chopped parsley to the melted cheese and season with a pinch of salt and pepper.

Drain the macaroni in a colander over a bow and reserve the cooking water. Return the pasta to the pan, pour in the melted cheese, and mix well. It should have a silky consistency, but if it’s too thick, add a splash of your cooking water to thin it.  (Mine did not need this, but I think everyone eats their mac differently)

To add a little extra crispy texture to the mac, I put the entire mixture in a 9x13 pan and baked it for about 10 minutes at 350 degrees or until golden brown on top.  You could even add some breadcrumbs for a crunchy topping.


Friday, October 26, 2012

Sew a Baby Swaddle Blanket

We needed a couple more blankets for Connor and I didn't want to spend $14 on them when they were just a piece of cute fabric. Why not make my own? The other benefit besides saving money is that you can make them whatever size you want.

I bought some cute flannel fabric and washed it before beginning. Then I trimmed the edges to the size I wanted for the blanket plus a 1/2 seam allowance.
I folded all the edges up 1/2 inch and pinned.

I cut a little triangle off each corner so the fabric would not overlap.

The I ironed all the folded edges to crease the fabric.

Kitty "helped" as I used a tight zigzag stitch around the edge of the blanket.


Here's the corners up close where I cut out the triangle.


The back side of the blanket looks nice with the stitching showing.
Connor keeps this one at daycare and it's held up very well!


Monday, October 15, 2012

Colorful Chocolate-Dipped Pretzels

This has become my go-to dessert when I need something for an occasion and I'm starting to be known for these. They're super easy and nothing too special, but they always seem to be a huge hit at parties. I love that you can customize them for different occasions with colors too!

These particular ones I made for Connor's sock monkey 1st birthday party to match the color scheme I used throughout the party. I thought I was making way more than I needed and I'd have tons of leftover, but they went so fast that I didn't even get to have more than 1 myself!

Ingredients:
• pretzel rods
Wilton Candy Melts in a few different colors

Pour candies into a tall glass and microwave for about 1 minute until mostly melted. If the candies aren't melted enough, put them back in for 10-15 second intervals. If you put them in too long, they burn and will thicken up too fast.

Dip pretzels into the glass with the melted chocolate. Spin the pretzel around so it gets covered with chocolate and then tap off the excess.

Place the pretzel on a baking sheet covered with wax paper to cool.

I usually start with one color and then start melting another color after I have a few done. That way, I can take the second color and use that as the decorative drizzle on the first color and vice versa. To do the drizzle, just tap the excess chocolate off a pretzel you're working on or use a spoon and lightly tap it to drizzle on the pretzel.

Let pretzels harden and cool for a couple hours and serve. They'll be gone in no time!


Monday, September 24, 2012

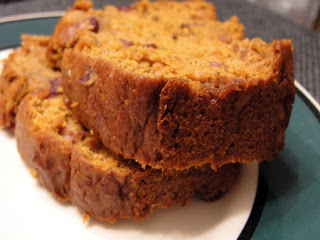
Cranberry Banana Pumpkin Bread


I love baking bread. It's so easy, you can pretty much put whatever you want in it, and it always turns out yummy! Here's one of the new breads that I really liked...

Adapted from here

Ingredients:
• 1 1/2 cups flour
• 1 teaspoon baking soda
• 1 teaspoon salt
• 1 teaspoon cinnamon
• 1/2 teaspoon nutmeg
• 1 teaspoon pumpkin pie spice
• 1 tablespoon butter
• 1 cup brown sugar
• 1 cup pumpkin puree
• 1/2 cup dried cranberries
• 1 egg
• 1 teaspoon vanilla
• 1 banana

Preheat oven to 350 degrees.

Combine dry ingredients in a large bowl.


Beat the butter, brown sugar, pumpkin, cranberries, egg, vanilla, and banana in another bowl until smooth. Stir in dry mixture.

Pour batter into 9x5 bread pan.


Bake for about 1 hour or until cooked throughout.

Let cool and enjoy!
Related Posts with Thumbnails