Wednesday, May 30, 2012

Three Cheese Artichoke Dip

You cannot go wrong with any kind of artichoke or cheese dip in our house. We'll eat it up! Long story, but our old grocery store used to sell this cheese artichoke dip in the deli section a few times a year and we loved it. They stopped selling it and we would always go back to see if it would be there by some miracle. So ever since then, we've been trying to replicate it. This recipe isn't the same, but it's still very good so I wanted to share.

Adapted from Paula Deen

Ingredients:
• 8 oz. block of softened cream cheese
• 1 cup mayo (I'm not big on mayo, so I would suggest a little less if you don't like it that much)
• 14 oz. can artichoke hearts, drained and chopped
• 2 green onions, sliced thin
• 1/2 cup grated Parmesan cheese
• 1 cup shredded mozzarella (we used low-fat)
• dash of worcestershire sauce
• salt & pepper
• dippers such as crackers, veggies, bread, etc.

Preheat oven to 350 degrees F.

In a large bowl, soften the cream cheese with a spatula.

Add in the mayo and mix until smooth.

Add remaining ingredients and stir together.

Transfer the dip to a 9x9 baking dish.

Bake for 30-40 minutes or until the top is golden brown.

Serve hot.

I dipped in some leftover french bread and it was really good!

Friday, May 25, 2012

DIY Sew a Fleece Shopping Cart Cover

Thank you to Crafty Gemini for this great video tutorial!

I followed her directions, but I also added an extra layer of padding between the front and back piece of fabric. Connor is pretty small, so he needs some extra padding to fit into a lot of the seats. The cover works great on all the carts we've tried so far and the fleece also comes in handy if you need a blanket in the car on a cold day.

Tuesday, May 22, 2012

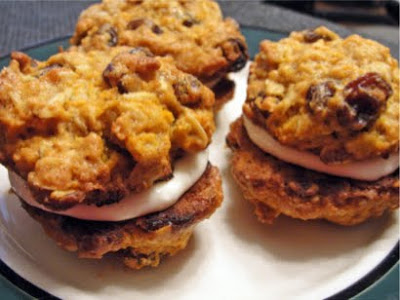
Healthy Oatmeal Carrot Sandwich Cookies

I figured if I bake desserts that are healthier, I can eat more of them. Am I right?
I saw this recipe in an issue of Parents magazine and wanted to give it a try.

Ingredients (slightly adapted by me)
  • 1 cup flour
  • 1/2 teaspoon baking powder
  • 1/2 teaspoon baking soda
  • 1/2 teaspoon cinnamon
  • 1/4 teaspoon salt
  • 1/4 teaspoon ginger
  • 1/8 teaspoon nutmeg
  • 1/2 cup vegetable oil
  • 1/2 cup brown sugar
  • 1/4 cup sugar
  • 1 egg
  • 1 cup rolled oats
  • 1 cup finely shredded carrots (about 3 medium-sized carrots)
  • 1/2 cup raisins
  • 6 ounces reduced-fat cream cheese, softened
  • 2 tablespoons maple syrup
Preheat oven to 350 degrees

Line 2 cookie sheets with parchment paper.

In a small bowl, combine the flour, baking powder, baking soda, cinnamon, sea salt, ginger, and nutmeg.

In a large mixing bowl, mix the oil, sugars, egg, flour mixture, oats, carrots, and raisins.

Make tablespoon balls of dough and place them onto prepared cookie sheets. Bake each sheet for 10 to 12 minutes or until cookies begin to brown. Remove from the over and let cool.

For filling, mix the cream cheese and maple syrup. Spread about 1 tablespoon filling on the flat side (bottom) of half of the cookies. Top with remaining cookies to make sandwiches.

The verdict: We felt like the cream filling wasn't sweet enough, but of course, it's supposed to be healthy. If you want a little sweeter filling, I would suggest adding more maple syrup or a little sugar. Or just forget the cream filling because the cookies were really good just dipped in milk!

Thursday, May 17, 2012

Work Cubical Photo Display

A couple months ago, I blogged about looking for ideas on a creative way to display photos at work. My desk is quickly becoming covered in baby photos and I need a way to keep them looking nice. After some different trials and spray painting gone wrong, this was my final decision.

I used some hemp (thanks to my coworker who was cleaning out her childhood bedroom) and some clothespins to hang them from my cube wall. I love that I have room to add two more rows as I accumulate more photos. It looks really organized and everyone comments on it when they walk by!

Friday, May 11, 2012

DIY Diaper Cover

Something about a baby in nothing but a diaper is just too cute, but I'd rather cover up that Pampers logo with something more fun like a diaper cover. When I was planning on outfits for Connor's 6 month photos, I made him a little red diaper cover to go with his sock monkey hat. It was really easy to do using this tutorial from Made.

Also, I want to wish all my bloggy friends a wonderful Mother's Day! Even if you're an aunt, big sister, or have an inside baby, it's our special day! I'm looking forward to celebrating my first holiday with a little miracle baby! Enjoy!

Monday, May 7, 2012

Tasty Cheddar Biscuits

I don't know about you, but I love me some Red Lobster biscuits. Nothing compares to those things and you can never replicate them...but you can try! This comes close and I definitely pigged out on them for dinner one day!

Recipe from Two Peas and Their Pod

Ingredients:
• 2 cups flour
• 1 teaspoon sugar
• 1 tablespoon baking powder
• 1/2 teaspoon baking soda
• 3/4 teaspoon salt
• 1 stick of butter
• 1 cup milk
• 1 cup shredded cheddar cheese
• 2 cloves garlic, minced
• 1/3 cup fresh chopped cilantro

Preheat oven to 350 degrees.

In a bowl, mix the flour, sugar, baking powder, baking soda, and salt.

Mix the butter into the dry ingredients. For me, it worked well to let the butter sit out for a bit to warm up. Blend until the mixture has pea size chunks of butter left.

Pour in the milk and mix until the ingredients are moist. Don't overmix.

Gently stir in the cheese, garlic, and cilantro.

Line a baking sheet with parchment paper. With a spoon or your hands, scoop the biscuits onto the baking sheet. For jumbo biscuits, use about 1/3 cup of dough. For smaller biscuits, use about 3 tablespoons of dough.

Bake the jumbo biscuits for 15-18 minutes. Bake the smaller biscuits for 12-15 minutes. Let them bake until they are golden brown and cooked throughout.

Remove from oven and let cool on a wire rack. Serve warm.

I promise they'll be eaten up before you know it!

Tuesday, May 1, 2012

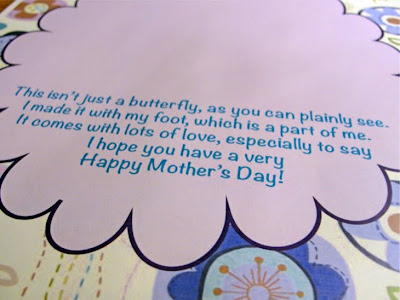
Mother's Day Butterfly Footprints

Another fun footprint idea for kids!
Connor and I did another quick craft together and I quickly learned how much harder this is going to be as he gets older. Now that he grabs at everything, using paint is much more of a mess!
As usual, we do this in the bathtub so he can get cleaned up right away.
I stamped his feet on some colored cardstock and cut them out. I also cut out little butterfly bodies and used some silver pipe cleaners for the butterfly antennae.
I printed out this little poem and left a space to attach the butterfly.
I also wrote "Love, Connor" and the date on the bottom.

Hope the Grandmas like them!

Related Posts with Thumbnails