Monday, November 28, 2011

Baby Taggie Stuffed Football

Every Sunday, Connor and his Daddy watch football. Sunday is Mommy's resting & shopping day! Anyway, I always say that he needs a little football outfit for Sundays, but all his football-themed clothing is still too big. So I made him a little football toy...that's also too big! He'll grown into it : )
I followed the pattern from The Train to Crazy with a few changes of my own. I had this thick white woven strips leftover from the belt I made. I reinforced the ends so they wouldn't fray.

I cut 7 inch pieces of ribbon for the taggies.

Then I pinned everything together and sewed the taggies on.

Using the fabric pattern from the link above, I cut my football-shaped fabric and put everything together.

With the right sides in, I sewed the football together and left an opening for stuffing.
I also added a few small jingle bells inside the stuffing to add some noise for the baby.

After stuffing the football, I hand-stitched the small opening closed.

Here he is showing off his new football! (Not too excited that day, but oh well...)

And since we're in Bears territory, I also made a Chicago Bears football.

Monday, November 21, 2011

DIY Brooch Bracelet

I hope you stopped by Bella Before and After where I was guest-posting on Friday about these super easy brooch bracelets I made. Bella is such a sweet blogger that I've gotten to know during the past year or so. Be sure to stop by and check out her fabulous blog and link up to her Amaze Me August link parties every Tuesday.

Photobucket

If you didn't catch my post, here's a recap...
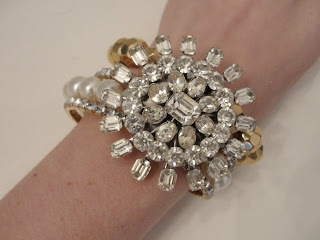
I was out shopping one day to find some jewelry for a dress and I came across this really cute idea. There was a whole display of beaded bracelets with a really pretty brooch holding them together. I had no idea it was a brooch until I really took a look at it when I tried it on. Very cool idea and most of us can make them with things we have at home already!

If you're like me, you save your jewelry through the years and never want to throw it out. I only wear my favorite things, but I save a lot of it in case it comes back into style or I have something that would match it perfectly. I had some of those groups of beaded bracelets that were so popular a couple years ago. I found 3 or 4 bunches that I've collected in the past 10 years.
I also had some pretty brooches that I've collected over the past 10 years. I even found one that my mom gave me from the early 90's! It's so simple to just clip it on to some bracelets and you have a cute new accessory!
These rhinestone bracelets are probably 11 years old and the brooch came from some blazer I bought maybe 5 years ago. But together, they're so fun!


This is the brooch from my mom that she used to wear years ago. I paired it with these fun gold, pearl & rhinestone bracelets from Forever 21.

Can't beat a craft that takes 2 minutes and gets tons of compliments!

I also want to send a quick HAPPY BIRTHDAY to my Hubby today! Love you!

Wednesday, November 16, 2011

Lowfat & Easy Pumpkin Cake

I can't miss out on all the pumpkin goodness this year! I made a few minutes to squeeze in a couple fun pumpkin treats including this semi-healthy & sweet pumpkin cake.

Adapted from here

Ingredients:
• 1/4 cup butter or margarine, softened
• 2/3 cup brown sugar
• 2 eggs
• 1/2 cup unsweetened apple sauce
• 1/2 cup canned pumpkin
• 1 cup flour
• 1 t baking soda
• 1/2 t salt
• 1 t pumpkin pie spice
• powdered sugar

Preheat the oven to 350 degrees.

Spray a 9x9 baking pan with non-stick cooking spray.


Combine butter, brown sugar and eggs in a large bowl.

Add in applesauce and pumpkin puree.

Mix the flour, baking soda, salt and pumpkin pie spice and then stir into the liquid mixture.

Pour into baking pan and bake for about 25 minutes.


Let cake cool and then top with powdered sugar.

Hubby warmed it and topped it with butter and I ate mine plain with some cold milk. Both ways were delicious!

Monday, November 14, 2011

Blogging with one hand...


Yep, I've done a lot of blogging and commenting on your blogs with one hand in the last 3 months - One hand on the keyboard and one hand holding the baby while I breastfeed.

The last 3 months have gone by way too quickly and now it's just about time to get back to "normal" life or my new normal which is life as a working mom. I go back to work on Tuesday. :::sigh::: I know a lot of you are working moms and I don't know how you do it. I really thought it would be a lot easier than it's turning out to be.

While I don't want to go back to work, I do miss my coworkers and the gossip. I also miss blogging and being about to chat with YOU more often. (Ok, I admit it. I blog at work when I have time.)

I know I promised this blog would remain a fun crafty, DIY & cooking blog, so I won't overload you with the baby gushing. I decided to make my baby blog public (for now at least), so if you're interested in reading it, go here.

But before I end this post, I can't help but add a few of my favorite photos from the last three months!


Tuesday, November 1, 2011

Parmesan Garlic Green Beans

It's hard to get people to eat veggies when they don't like them. So what can you do to make them a little tastier? Add some cheese and spices and they suddenly become a lot more appetizing! I want to thank Christina's Taste Test Project for this awesome recipe.

Ingredients:
• 2 cups fresh green beans
• 2 Tbsp olive oil
• salt & pepper
• parmesan cheese

Preheat the oven to 400.

Pour green beans in a large bowl.

Mix olive oil, salt & pepper and parmesan cheese with the green beans.

Toss to coat green beans evenly.

Spread green beans on a baking dish. Cook for 15 minutes or beans turn a light golden brown.


Tons of flavor and very good!
Related Posts with Thumbnails