Tuesday, December 29, 2009

Family room progress & a 47" new toy

Things have been a little slow in December since we got so busy with the holidays. Now that all the festivities have died down, we've had more time to work.

We got the tile put on the hearth...and then decided to rip out 3 weeks of work because we didn't like how it looked. And then we had to buy more tile which turned into a nightmare as all the stores seemed to be out of our color. A 45-minute drive to find more tile and we were back on track!

So here's the Durock covering some of the brick and then we tiled over it. We also discovered it helps to make a fire while we work since it gets so COLD without doors on!

More tile on the hearth after we ripped out the first attempt.
I cut all the old glue off the back of the fireplace doors. We'll probably be painting the doors soon so they match better.

Over the weekend, we picked up our new toy! A 47" LCD LG tv!


We set it up in another room so we could enjoy it until the family room is ready for it.
We also got the wall mount up so we can hopefully mount the tv next week!
It's finally coming along!

Wednesday, December 16, 2009

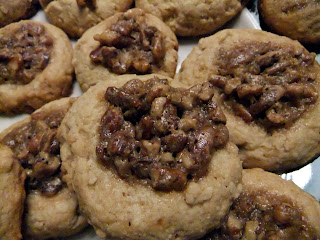
Love pecan pie? Try these tasy pecan pie COOKIES!

I told you how much I love this pecan pie recipe in this post, so now it's time for some pecan pie COOKIES!

This recipe makes about 24 larger cookies ro 36 smaller cookies.

Ingredients:

Cookies

  • 1 cup brown sugar, firmly packed
  • 3/4 cup butter, softened
  • 1 egg
  • 1 teaspoon vanilla
  • 2 cups flour
  • 1 teaspoon baking powder

Filling

  • 1 cup chopped pecans
  • 1/2 cup brown sugar, firmly packed
  • 1/4 cup heavy whipping cream
  • 1 teaspoon vanilla
Preheat oven to 350°F.

Beat butter and sugar on medium speed of an electric mixer until creamy. Add egg and vanilla and mix. Reduce speed to low and add flour and baking powder. Beat until well mixed. (I don't have a mixer, so I use my husband. That also works very well!)


Combine all the filling ingredients (pecans through vanilla) in a small bowl and mix well.


Shape dough into 1 1/4-inch balls (Use this size if you want larger cookies. I had to make over 100 cookies, so I started making smaller balls.) Place 2 inches apart on ungreased baking sheets.

As you can see here, I used a teaspoon to create a small indentation in each cookie for the filling.


Fill each cookie with 1 rounded teaspoon of filling.

Bake for 8-12 minutes or until lightly browned. Cool for 1 minute on baking sheet then remove to cool completely on a wire rack or sheet of aluminum foil.


YUM! They were SO good and I've been eating them all week!


Saturday, December 12, 2009

Yummy Pecan Pie

I have to confess that I never had pecan pie until a few years ago. But once I tried it, I was hooked! It's a special treat we only have a couple times a year at holidays so we decided it was time to try to make our own (thanks to Martha). I was a little intimidated because it looks difficult, but it really wasn't too bad! It turned out to be delicious and I got tons of compliments!

Pecan Pie

Ingredients:

(Makes one 9-inch pie)

  • Frozen store-bought pastry shell (or make your own if you're up to it)
  • 2 1/2 cups pecan halves (half of these will need to be chopped)
  • 4 large eggs
  • 1/2 cup sugar
  • 1 cup dark corn syrup
  • 1/2 cup light corn syrup
  • 1 teaspoon pure vanilla extract
  • Whipped cream, for serving
Preheat oven to 350 degrees. If using a homemade pastry shell, lightly dust a clean work surface with flour, and roll dough into a 12-inch circle. Fit circle into a 9-inch pie plate being careful not to stretch dough too thin; create edges of choice. Transfer to freezer until firm, about 15 minutes.

If you're using a store-bought frozen pastry shell like I did, follow the directions on the package.


Coarsely chop 1 1/4 cups pecans. I used the blender to chop them and it worked really well.


In a medium bowl, combine eggs and sugar. Whisk to combine. Add corn syrups and vanilla. Whisk until well combined.


Add chopped pecans and stir.


Pour into prepared crust.
Arrange remaining 1 1/4 cups pecan halves decoratively on top of pie. You can do this the easy way and just place them on top randomly. Or make a pretty design like I did : )

Bake until crust is golden, filling is firm, and a cake tester inserted in center of pie comes out clean; 50 to 55 minutes. Cool completely before slicing. Serve with whipped cream.

And here's the pie on the Hanukkah dessert table waiting to be devoured.

Yum! A second slice please!

I have a little dreidel...Part II


I promised more Hanukkah crafts, didn't I? And I'm proud to say this one cost me almost NOTHING to make!

Supplies:
Scrap wood or wood blocks from a craft store
Acrylic paint
Paint brush
Mod Podge
Foam brush
Glitter
Scrapbook paper (See my secret below to get this for FREE!)


I made my own blocks using scrap wood from the family room reno. I cut 11 blocks to 1.5" x 1.5" and I cut one block 2.75" x 1.5".


I found this really pretty metallic blue to paint all the blocks.

They're so shiny and pretty!

...On a tangent for a second...
I HATE that scrapbook paper is so expensive. How can they charge 99 cents for a piece of paper when it's just a PIECE OF PAPER? A cheap project gets expensive really fast when you start stocking up on a few pieces. My solution? Free digital scrapbooking websites. I'm not going to pimp out one or the other, but let's just say Google is your friend.

And nowback to the directions...
I found 3 pretty scrapbook paper patterns and adjusted them in Photoshop to the colors I wanted. Print them out. Notice that this step was FREE! I printed my letters right on the paper as you can see, but you could also hand write yours if you prefer.


I made my scrapbook paper squares about 1" x 1" so there would be a border around the edges once they're glued on. Cut out the squares and use Mod Podge to attach them to your wood blocks.

Make sure to smooth out each paper piece so there are no bumps or wrinkles.When your paper square dries, add another coat of Mod Podge over the top of the block and the paper. Wait for that layer to dry.

Now the messy part...I do this in my basement in case I make a huge mess!

Using Mod Podge again, brush a thin layer along the border of the wood block where there is no scrapbook paper.
Then dip your block into a glitter and brush off the excess. (I like using a paper plate for glitter because it's easier to clean up. When you're done, you just fold your plate in half and pour the extra glitter back in the container without making a juge mess.)

Glitter all your blocks and let them dry.

There's so many different ways to display these blocks...in one line, stacked, as a centerpiece, etc. Enjoy and Happy Hanukkah!


These look amazing when the sun is shining and the glitter is sparkling! I love them!

A glittery, yummy Hanukkah!


And the last Hanukkah crafts of 2009 are here! See my glittery Hanukkah banner and then scroll to the bottom of the post for a tasty Hanukkah treat idea!

This banner is super cute and glittery and cost me almost NOTHING to make! I want to thank Centsational Girl for my inspiration on this.

Supplies:
scrapbook paper
glitter
ribbon
spray glue
hole punch
scissors

I started out by picking some pretty patterned scrapbook paper. Want FREE scrapbook paper? See my secret tip on this post.

I made a template for the banner shape that I wanted. Using the template, trace your shapes and cut them out.
Then I used spray glue to attach the pieces together.

Glue tip: It's the most messy and annoying to use, but spray glue works the best. Elmer's glue, rubber cement, and other adhesives tend to come apart after awhile. Spray glue has always worked the best for me and it's what we use at work for professional signage and mockups.


Punch holes in the top corners of each shape.
After playing with fonts for awhile, I decided on simple Futura since it would be easiest to read from far away. Print your letters and cut them out.

And now the messy part...
Use spray glue to lightly spray your letters.


Dip each letter into glitter and tap off the excess.Then use spray glue to attach your letters to the background shape.

Next I cut ribbon to attach each piece together. Each ribbon piece is about 5" and then I cut longer pieces for the ends so the banner can be hung.
Tie your letters together. In order to keep the paper from ripping once it's hanging, I wanted to create a little extra space in each knot, so I used a pencil to hold the space and then pulled it out once I tied the bow.

Hang and enjoy!
(Hopefully next year this can be hung on the mantle that we're working on now...)


I had to post this awesome cupcake menorah recipe to show you. How cute is that? I wish I would have had time to make them!
Related Posts with Thumbnails