Tuesday, July 23, 2013

How to Sew Straps on a Toddler Hat


Do you have a toddler who loves to take their hat off and throw it?  I do!  If I can distract him, he'll keep it on, so any help I can get with velcro straps are always appreciated.  It seems like most hats bigger than about 12 months don't come with straps (why not?) so I had to add my own to a couple of his summer hats.

I used one of the hats that does have straps as my guide when making my own.

I measured the straps on the hat above and used that number as a guide.  I added a couple extra inches onto my measurements and I could always cut them off later.  Better safe than sorry!  I cut two long pieces of fabric that were about 10 in. x 2 in.  I folded each one in half longways and pinned.

To get a good crease, I ironed the strips.

Once the fabric cooled, I opened the fold and then folded each edge in towards the middle (where the ironed crease is).  Again, I ironed the fabric.

After the fabric cools, fold each side in towards the middle again and you'll have a perfect crease. 

I took each strap and sewed a straight line down the side to keep the crease closed.  Then I added a little piece of velcro to each strip and sewed it on.

The tricky part is figuring out how long each strap needs to be to fit the child.  I used my hat with straps (shown above) as a guide and then tested it on my son to make sure it fit.

I cut off the excess fabric on each strip and then folded over the edge.  A couple stitches on the sewing machine was an easy way to attach the straps.

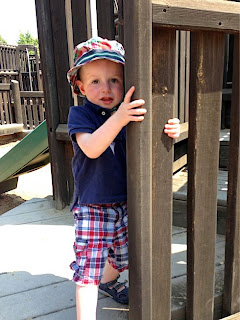
Here he is modeling his new hat on the 4th of July!

He actually loves wearing it too!

Thursday, July 18, 2013

Beer Chelada

I'm in shock that it took me so long to hear about this! I was at a Mexican restaurant, saw a beer chelada on the menu and I decided to give it a try...Yum!  How could I have been missing out for all these years? 

Ingredients:
• light beer
• lime juice
• fresh lime
• margarita salt/coarse salt

Take a damp paper towel and wet the rim of the glass.  Dip the top tip of the glass in salt.

Carefully pour in a little lime juice. (I'd suggest tasting and adding more if you like your drink more sour.  I think I used about a tablespoon.)

Fill the rest of the glass with beer and top with a fresh lime for garnish.

The perfect summer drink!


Thursday, July 11, 2013

DIY Painted Beer Glasses (Mommy's Sippy Cup!)

I don't even remember where I got this idea, but I thought it was perfect for us.  When I spotted these beer glasses for 25 cents each, I decided it was the perfect excuse to paint some for us. 

This tutorial works with any design or text you'd like on your glass (or even wine glass or shot glass!), but I'm just showing how I did it using the sippy cup graphic and text.  I measured how much space I wanted to use on the glass and then printed out my graphic to fit.


There are a lot of different paint markers you can buy for painting on glass.  I ended up choosing these Sharpie oil-based paint markers because they had pretty good reviews online and I like the marker better than working with a paintbrush.

If you decide to paint glasses, I'd suggest practicing a little until you get the hang of working on glass and getting used to the thickness.  I used an old spaghetti sauce jar to practice on.
I taped my graphics to the inside of the cup and then started painting with the pink.

Once the pink was dry, I painted with the black marker for the outline and the text.  To make the text perfect, I waited for it to dry and then went back to do some touch-ups later.

The final result is really cute!  I kinda don't even want to use them in case they get ruined!

Monday, July 8, 2013

Shabby Apple Giveaway Winner

Thank you so much to everyone who entered the Shabby Apple Vintage Dress Giveaway!


The winner is...


• • •


Hope everyone had a great holiday over the weekend!  

More recipes and craft posts to come soon...

Tuesday, July 2, 2013

Strawberry Lemon Shortcake


This is the perfect summery dessert.  The lemon and strawberry flavors are so fresh and fun to eat on a warm day!  I made this for a family party and it was gone before we knew it!

Adapted from Taste of Home
Ingredients:
• 1 1/3 cups flour
• 1/2 cup sugar
• 2 teaspoons baking powder
• 1/4 teaspoon salt
• 1 egg
• 2/3 cup buttermilk
• 1/4 cup melted butter
• 1 tablespoon fresh lemon juice
• 1 teaspoon lemon peel
• 1 teaspoon vanilla
• 1.5 cups sliced strawberries


Topping:
• 1 cup sliced strawberries
• 1 tablespoon fresh lemon juice
• 2 teaspoons sugar
• 2 cups fat-free cool whip

1. In a large bowl, mix together the flour, sugar, baking powder and salt.

2. In another bowl, combine the egg, buttermilk, butter, lemon juice, lemon peel and vanilla.  Mix into dry ingredients.

3. Add strawberries to the mixture and pour into a 9 inch round pie pan covered with non-stick cooking spray.

4.  Bake at 350° for 20-25 minutes until cooked throughout. Let cake cool completely before adding topping.

5. In a small bowl, mix together topping ingredients.  Cover bowl and refrigerate until ready to serve.  Just before serving, spread cool whip evenly on the top of the cake and then add strawberries.

Monday, July 1, 2013

Shabby Apple Vintage Clothing Giveaway!


Summer is the perfect time to rock a cute little dress.  I am so in love with this vintage clothing from Shabby Apple!  There's something to appeal to every size, occasion, and personal style.  While I love dresses, I always feel self-conscious in them and never get the guts to wear them.  However, I might make an exception for these beautiful styles!

I'm loving some of these gorgeous vintage dresses at Shabby Apple that I think might be flattering on me like...

At First Sight

Animalia

Ipanema

Sleek Shadow
Champs Elysees

Happy Talk


Want to WIN vintage clothing from Shabby Apple?  I'm kinda jealous that one of you is going to win something pretty!

a Rafflecopter giveaway


Make sure to leave your name and email so I can get in touch with you if you win!

Good luck!
Related Posts with Thumbnails