Thursday, October 28, 2010

Painting Wood Trim Tutorial

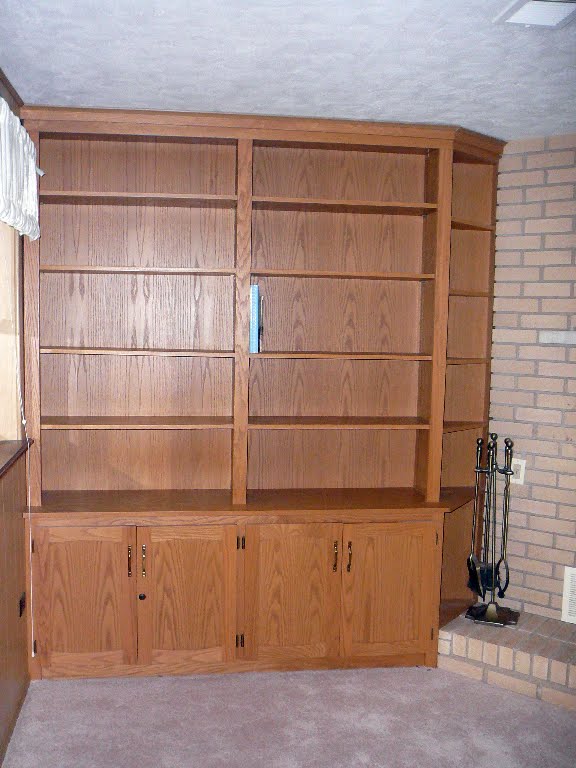
Do you have a 70's-chic or 80's-tastic house full of oak trim? I sure do!
I decided to make the really risky decision to slowly paint all my trim white. People warned me about how horrible this would be, but I really wanted to do it. So I'll be honest when I say how much it sucks to do it. It looks amazing when it's done, but I guarantee it's a huge PITA.

Now that I've conquered the trim in 3 rooms, can I consider myself an expert? I've learned a lot along the way and I wanted to share my tips.

First off, be SURE you want to do this. You can't go back!

Once you're sure, start by lightly dusting the trim with a rag. People may tell you to lightly sand, but I've found that it really didn't help at all, so don't waste your time.
Paint on your first coat of primer. It should be pretty thick, but not horribly thick that it dries weird. After trying a couple different brands of primer, I prefer Kilz.

Primer dries pretty fast, so you won't have to wait too long to do the next coat. Again, add a thick coat, but not too thicker. The thicker and neater you can get it on, the less coats you'll need.

And as you start to get sick of doing this, add one more coat of primer. The wood grain should be showing less and less after each coat. I promise you're getting closer!


If you're planning on painting the walls, do that next. (I know some people like to do these things in a different order, but this works best for me.) If you need 2 coats of wall paint, do both of those before continuing with the trim.

When the wall color is done, continue with the trim. I switch over to a semi-gloss white for the final coat or two. I like semi-gloss for the trim for a brighter finish.

One or two coats of the semi-gloss and you're finally done!

:::wipes brow:::
That was a LOT of work and I promise I never could get this done in a weekend. All 3 rooms I've done took weeks or months to finish. Anyone wanna come do the rest of my house?

I'm linking this tutorial up here

Monday, October 25, 2010

Pumpkin Spice Oatmeal

Ok, so I sometimes eat breakfast food for dinner. It's too easy not to do it when you're really tired! This was perfect for a quick and sweet meal.

Makes one serving

Ingredients:
• 1 cup oatmeal
• 1 cup water
• 1/4 cup milk
• 1/4 cup pumpkin puree
• 1/2 teaspoon cinnamon
• 1 tablespoon brown sugar
• 1 teaspoon sugar

Mix oatmeal, milk, and water in a bowl.

Microwave for 2 minutes.

Stir in pumpkin, spices and sugar.

Add more milk if needed.

Dig in! Sweet & tasty!


Linking up this fabulous recipe here...

Thursday, October 21, 2010

Sew a Stuffed Football

I will give Hubby the credit for this project. It was all his idea and I used him as a judge on how authentic it looked. The stuffed football sounded really easy, but it turned out to be a bit of a pain. I spent 4 hours on a Sunday trying to create a pattern that would work and I got so frustrated that I gave up and then had nightmares about it that night. But the next day I was able to perfect my design and come up with the awesome football you see here!

I started out by printing this template below. It can be resized depending on how large you want the football to be.

Trace and cut out three pieces of fabric.

Pin two pieces with right sides together. Sew only ONE side of the oval together. Then add the third piece and sew only one side to the two already attached.

On one of the seams, I measured 8 points where the lacing will go and I marked all the holes with pins.

To make the holes, I used an eyelet stitch on my machine. I added 8 holes on each side of the seam which is 16 eyelets total.
Using a small scissors, I punched a hole in each eyelet.

To make this step much easier, use a shoelace to lace the football. Tie a knot at one end.

Then loosely lace through all the holes and tie a knot at the other end.

Once the lacing is done, the football can be closed. Attach the two ends of fabric with right sides together. Sew it closed and leave a few inches open in the middle so you can turn the fabric right-side out.
Stuff the football and hand sew the opening closed.

Football fun!
Mine is about the actual size of a football so we can actually throw it around!
Linking to all these fun parties!

Monday, October 18, 2010

Sesame Chicken Pasta Salad

I LOVE pasta salad especially in the summer when you don't feel like eating something hot and heavy. I adapted this recipe from There's Always Thyme to Cook and it was great!

Ingredients:
• 1/4 cup sesame seeds
• 1 (16 ounce) package pasta
• 1/2 cup vegetable oil
• 1/3 cup balsamic vinegar
• 1/3 cup light soy sauce
• 1/3 cup white wine vinegar
• 1 teaspoon sesame oil
• 2 tablespoons white sugar
• 1/4 teaspoon black pepper
• 3 cups chopped, cooked chicken breast meat
• 1/3 cup chopped fresh cilantro
• 1/3 cup chopped green onion
• 1/3 cup shredded carrots
• 2 T vegetable oil (for cooking spinach)
• fresh spinach ( I used half a bag)

Bring a large pot of water to a boil. Add pasta, and cook for 8 to 10 minutes, or until al dente. Drain pasta, and rinse under cold water until cool. Transfer to a large bowl.

While boiling the pasta, pour vegetable oil into a small pan and heat. Add spinach and cook until wilted.

In a jar with a lid, combine vegetable oil, soy sauce, white wine vinegar, balsamic vinegar, sesame oil, sugar, sesame seeds, and pepper. Shake well.

Pour sesame dressing over pasta, and toss to coat evenly. Gently mix in chicken, cilantro, spinach, carrots and green onions.

Serve hot or cold. (I prefer cold)


SO good and great for leftovers!


Linking up to these parties

Thursday, October 14, 2010

DIY Burlap Pumpkins

As if I still don't have enough pumpkins, I had to try one last idea. This one took a little thinking, but they came out really cute!

To make these, follow the pumpkin tutorial here, but with a small twist. Instead of using a printed fabric, I used burlap with a layer of thin beige fabric underneath. I used clear fusible webbing to attach the burlap to the beige fabric and then following the pumpkin directions mentioned above.
DSC02012

Of all my pumpkins this year, these were my favorite.
I love the texture and natural look of the burlap.
DSC02013

DSC02014

If you'd like to see the other stuffed pumpkin designs, go here and here.

Party it up at these fun link parties!

Wednesday, October 13, 2010

Simple Leaf PIllow Tutorial

I was walking through Walmart and saw these cute leaf placemats for $3. I showed Hubby how I read on Tattered & Inked that Kelsey took 2 of them and sewed them together to create a pillow.

Anyway, he convinced me to make one for our house...he always makes me buy things when we go shopping! He came up with a way to make the pillow even cheaper by using only 1 placemat instead of 2. See how my crafty creativity is rubbing off on him?

So here's my placemat before. I used the seam ripper to rip out some of the stitches attaching the leaf to the back of the placemat.

Then I stuffed it and pinned it back up.
It took a couple minutes to sew the hole closed.

Voila! New fall pillow in 15 minutes!

Monday, October 11, 2010

My Favorite Fall Recipes

I wanted to share some of my favorite fall goodies from the past year.
They're all so good that it's hard to pick!

Low Fat Pumpkin Fluff

Low Fat Pumpkin Angel Food Cake

Pumpkin Pecan Bread


Apple Maple Glazed Chicken


Amazing Pecan Pie


And by the way, I may just need to go on strike from looking at food blogs until after the holidays. There is SO much yummy stuff out there and you all make me wanna pig out!

See where I'm linking up to here

Friday, October 8, 2010

Amazing Bookcase makeover

Yikes! This is even embarrassing to post!

Here's our old family room built-in bookcase when we moved in last September. At first, we were going to rip it out entirely, but then we decided it was a great place for storage and we could probably transform it easily.

5 coats of paint and many days of frustration later, here's our painted cabinet.
The next huge task was filling the bookcase. It didn't seem like something too difficult, but once I started adding things, I realized how HUGE it was and how long it was going to take to fill it.

This is definitely a work in progress as I collect more accessories and books to add to it. I change up the little collections every few weeks when they start to bother me!
DSC01920

The Willow Tree angel collection was also a challenge. I was really into these in college and right after, but it got to the point where I had way too many and I didn't know what to do with them anymore. I put them in a box for a year and then pulled them back out for the bookcase. My randomly placing angels throughout the bookcase, it's not as overwhelming as the whole collection together.

And no, I'm not PG again. That's our angel from earlier this summer with the Willow Tree figurine my mom gave me the day of the surgery.
DSC01922

I chose to take the paper covers off all my books and only use hardcover books. I think it looks cleaner, but it also means it's going to take much longer to fill. I usually only buy paperback because I like to fold the books when I'm reading.
DSC01923

I also tried to keep with the color scheme of the room so all the photo frames match the other accessories in the room.
DSC01924

Some of the little accessories and bookends are from my spray paint extravaganza which you can read about here.
DSC01925

Big transformation, huh? We love it!

See the fun parties I'm linking up to here

Wednesday, October 6, 2010

Yummy Corn Dogs

We've been having theme dinners on Wednesday. Why? I don't know, but Hubby started making all kinds of fun food every Wednesday while I'm at kickboxing class. Last week was carnival food night so he made these awesome corn dogs and I wanted to share them with you.

Ingredients:
• 2 cups vegetable oil
• 1 cup yellow cornmeal
• 1 cup all-purpose flour
• 2 teaspoons kosher salt
• 1 teaspoon baking powder
• 1/4 teaspoon baking soda
• 1/2 teaspoon cayenne pepper
• 1 (8.5-ounce) can cream-style corn
• 1/3 cup chopped onion
• 1 1/2 cups milk
• 4 tablespoons cornstarch, for dredging
• 8 hot dogs (we used turkey dogs)
• chopsticks (if you want corn dogs on a stick)

Pour oil into a large pot and heat.

In a mixing bowl, combine the cornmeal, flour, salt, baking powder, baking soda, and cayenne pepper. In a separate bowl, combine the corn, onion, and milk. Add the dry ingredients to the wet ingredients, and stir only enough times to bring the batter together. There should be lumps in the mixture. Set batter aside and allow to rest for 10 minutes.

Scatter the cornstarch into a dry pie pan. Roll each hot dog in the cornstarch and tap to remove excess.

Transfer enough batter to almost fill a large drinking glass. Refill the glass as needed. Place each hot dog on chopsticks, and quickly dip in and out of the batter. Immediately and carefully place each hot dog into the oil, and cook until coating is golden brown, about 4 to 5 minutes. With tongs, remove to cooling rack, and allow to drain for 3 to 5 minutes.


YUM! Not healthy, but very fun! : )

See where I'm partying it up! Go here!

Monday, October 4, 2010

Pumpkins Galore

You can never have too many pumpkins, right?

I already showed you my sports-themed pumpkins (tutorial & pics here),
but I had to continue the fun and made these cute orange flannel pumpkins...
DSC02018

DSC01990

DSC02020

And these pretty striped pumpkins...
DSC02001

And some Halloween-style pumpkins...
DSC02010

Stay tuned for more pumpkin fun!

See where I'm partying today by clicking here
Related Posts with Thumbnails