Showing posts with label accessories. Show all posts

Monday, January 5, 2015

Easy Baby Hair Bow Hanging Closet Storage

Baby girl might have a few too many hair bows & headbands, but really, you can never have enough, right? She needs one to match every outfit and occasion!  Finally, I found the perfect solution to hold everything!  This closet organizer is double-sided so it actually holds twice as much as what I have here. 

I love that it fits perfectly in her closet so it doesn't take up a bunch of space in her room.
Brilliant! I'm so happy to have some organizing done for the new year!

Wednesday, September 17, 2014

DIY Girly Hanger Hair Bow Holder


I might do have a small addition to baby headbands and bows.  It's so fun to make them and she look so darn cute in them!  Here's a few of the ones I've made for her in the last couple of months: upcycled t-shirt headbands and flower headbands.  The number of hair bows is started to get out of control and she's only 3 months old, so I decided it was time for some organization.  I wanted something that I could hang in her closet so it would be out of the way, but it would also be easily accessible and I would be able to see all her hair accessories at one time.
(I apologize for the photos that are kinda dark.  That's what happens when I get super busy and it's rainy on the one day that I have a few minutes to get some photos done!)

This idea is a combination of several different ones I've seen before and I just mixed them together to create my own concept.  I took a padded hanger from her closet to use as the base.

At the craft store, I found this little wooden tag for less than $1 that would work perfectly for her name.

I painted the wood yellow and then printed out her name in a pretty font.

Using my easy pencil trick, I transferred her name to the wood.

I used a silver marker to trace over the pencil.

To hang the ribbon from the hanger, I used my glue gun.  My warning with this is to make sure you glue it very well and you might even consider using super glue.  Mine broke after a couple days, so I had to redo it.  But I also have WAY too many hair bows for a 3 month old baby!


To add a little extra flair, I added a pretty bow to the top of the hanger.


Of course, I'm going to move this into her closet, but it works well on her doorknob for pictures.  I love it and it's so easy to grab a bow and go!

Tuesday, August 20, 2013

DIY Sew an Elmo Sun Hat


This might not be the most thorough tutorial, but I wanted to post it just to give readers an idea of what I did.  To make a normal reversible sun hat, I found a tutorial on another blog.  (Sorry, I searched for awhile and I cannot remember which one it was!)  I picked Sesame Street fabric for one side and plain red fabric for the other side so I could add the Elmo face.  

Before I completely sewed the entire hat together, I started working on the Elmo face so I could make sure it fit on the hat.  I printed out a picture of his face that was resized to fit the hat.

I used some little scraps of fabric for the eyes, nose and mouth and two black buttons for the eyes.

Using my printout as a guide, I cut out the face shapes and ironed some fusible interfacing on the back to make them a little more stiff.  I sewed the buttons onto the eyes by hand and then used the machine to do the rest.

I carefully pinned the face pieces onto the hat and then used a zig-zag stitch to embroider them onto the hat.  Unfortunately, my sewing machine had a mind of its own that day, so the stitches don't look as nice as I wanted them to.
Here he is showing off the Elmo face on one side...
And the Sesame Street print on the other...


I love how it turned out and it's great to have two different hats in one!


Tuesday, July 23, 2013

How to Sew Straps on a Toddler Hat


Do you have a toddler who loves to take their hat off and throw it?  I do!  If I can distract him, he'll keep it on, so any help I can get with velcro straps are always appreciated.  It seems like most hats bigger than about 12 months don't come with straps (why not?) so I had to add my own to a couple of his summer hats.

I used one of the hats that does have straps as my guide when making my own.

I measured the straps on the hat above and used that number as a guide.  I added a couple extra inches onto my measurements and I could always cut them off later.  Better safe than sorry!  I cut two long pieces of fabric that were about 10 in. x 2 in.  I folded each one in half longways and pinned.

To get a good crease, I ironed the strips.

Once the fabric cooled, I opened the fold and then folded each edge in towards the middle (where the ironed crease is).  Again, I ironed the fabric.

After the fabric cools, fold each side in towards the middle again and you'll have a perfect crease. 

I took each strap and sewed a straight line down the side to keep the crease closed.  Then I added a little piece of velcro to each strip and sewed it on.

The tricky part is figuring out how long each strap needs to be to fit the child.  I used my hat with straps (shown above) as a guide and then tested it on my son to make sure it fit.

I cut off the excess fabric on each strip and then folded over the edge.  A couple stitches on the sewing machine was an easy way to attach the straps.

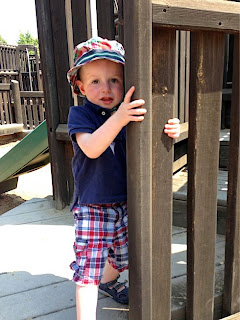
Here he is modeling his new hat on the 4th of July!

He actually loves wearing it too!

Tuesday, June 11, 2013

How to Spray Paint Shoes

This is one of my favorite DIY secrets.

When I have a pair of shoes that I absolutely love, I usually regret not buying them in multiple colors.  However, sometimes they don't sell them in the color I want, so I have to do a little creative work.  I actually did this project back in 2007 here, and I saved everything so I could use the supplies again.  This is the pair of Old Navy sandals that I used.  I love the white ones I have, so I wanted a black pair too.  When I found out they didn't sell them in black, I decided to paint them myself.

To find out how to do this correctly, I went to a local shoe repair store and the owner explained the best way to do it and gave me the supplies to use.  If you'd like to try this, I'd suggest buying similar supplies made for shoes so that you know the product will work well.  First, I started with the color preparer and some rubber gloves.  I poured a little on an old rag and wiped down the sandals straps.  This is used to strip down any dirt, grease, or finish from the straps.

I found a roll of painter's tape that I used to cover up all the areas that I didn't want painted.  This takes a little time, but it's worth it to get the paint where you want it.

I stuffed newspaper inside the sandals just as an extra precaution to make sure no paint got on the inside of the straps.

I used Meltonian color spray from the shoe repair shop to spray the shoes.  It took about 3 coats to make sure I got all the little crevices and straps completely covered.

When I ripped off all the painter's tape, I had my perfect pair of black sandals!

I love them and they came out perfectly!  If you're concerned about the color staying, I'll vouch for the shoe spray I used because the ones I did back in 2007 still look perfect like they did when I first painted them.

Monday, January 7, 2013

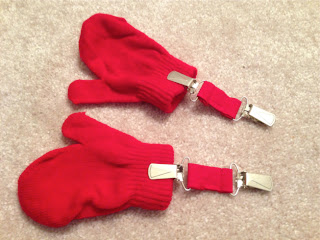
DIY Sew Childrens' Mitten Clips


If you've got young kids, you probably deal with missing mittens and gloves all winter long.  I really didn't think I'd have this problem with a 16 month old, but a little toddler is not really ready to keep track of his own mittens at daycare!  Anyway, these old school mitten clips I made him have made my life a lot easier and I'm not freaking out about missing mitten every other day.  Once I made a set for him, I'm happy to say we haven't lost a mitten since!

This whole thing took me about 15 minutes - max!  I cut out a long piece of fabric that was about 3 in. x 16 in.  I folded it in half longways and ironed the crease. (You could also use ribbon to avoid doing the fabric and ironing, but I feel like fabric is a little better for a rough boy!)


Once the fabric cools, fold both ends towards the middle crease that you just made and iron again.  Now you have a thin piece with the unfinished ends hidden.


Pin the fabric strip along the edge and sew the edge to close it.

Once the strip is sewn closed, I cut it in half so I had two shorter 8 inch pieces.

I bought 4 mitten clips at the fabric store.  They're usually located near the sewing supplies like needles, snaps, and zippers and come in sets of two.

Wrap the end of each strip around the mitten clip and fold the unfinished end under.

The length of the fabric really depends on the age of your child and how long you think would work best.  Since my son is still pretty young, I made the straps really short and cut off the excess fabric.

After pinning the fabric, I sewed each side on the machine.  It's a little tricky to get the tiny pieces to go through the machine, but I got it to work.

Super easy and they're so cute!


Here's my little model showing off his new mitten clips! 
Aren't kids with mittens adorable?

Related Posts with Thumbnails