Showing posts with label craft room. Show all posts

Monday, June 4, 2012

Craft Room Reveal

This room was been a work in progress for about 2 years and then I suddenly realized I never shared it with you! If Hubby can have a man room, I get a craft room, right? It also doubles as a guest room when people stay over, but I can share : )

Here's what the room looked like before. Nasty window treatments and just a place to hold random crap that didn't have a home.
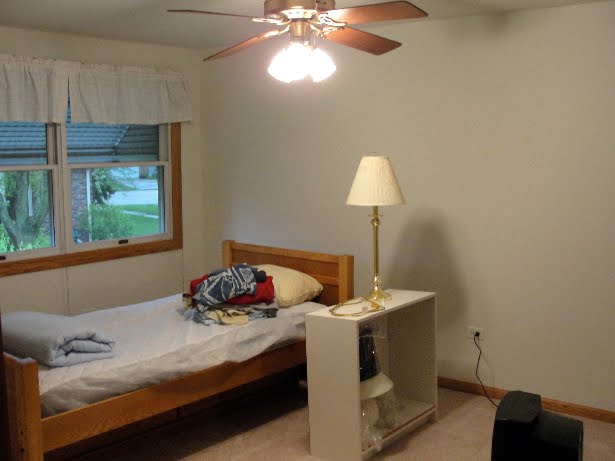
It was hard for me to do crafts in such an icky room!

Goodbye ugly old fan!

Hello bright and colorful room! My vision with this room was fun & energetic with lots of bright colors. It's the only room in our house that's girly and filled with color.

The striped bedding was the influence for the rest of the decor. The curtains are actually made from the bedskirt fabric that came with the bedding set. Since we have trundle beds, we didn't need the bedskirts, so I recycled them into fun curtains. See the tutorial for this style of curtain here.

This bookcase is a leftover from college, but it works perfectly as a nightstand. A lot of the items here are fun crafts I worked on during the past year.
Easy Fabric-covered lamp shade
Flowers in a Coffee Mug
Fabric Tissue Box Cover
Mini Canvas & Easel

I love all the fun throw pillows that coordinate with the bedding. I couldn't resist buying them!

No craft room of mine is complete without a tv because we all know I'm a tv addict. The dresser is a hand-me-down that my sister got and then it was passed to me and begging for a makeover. It was ugly & brown so we repainted it a couple summers ago.
Here's the sewing area and my little chair cushion makeover. The chair cushion was refashioned from a throw pillow I bought for the bed.

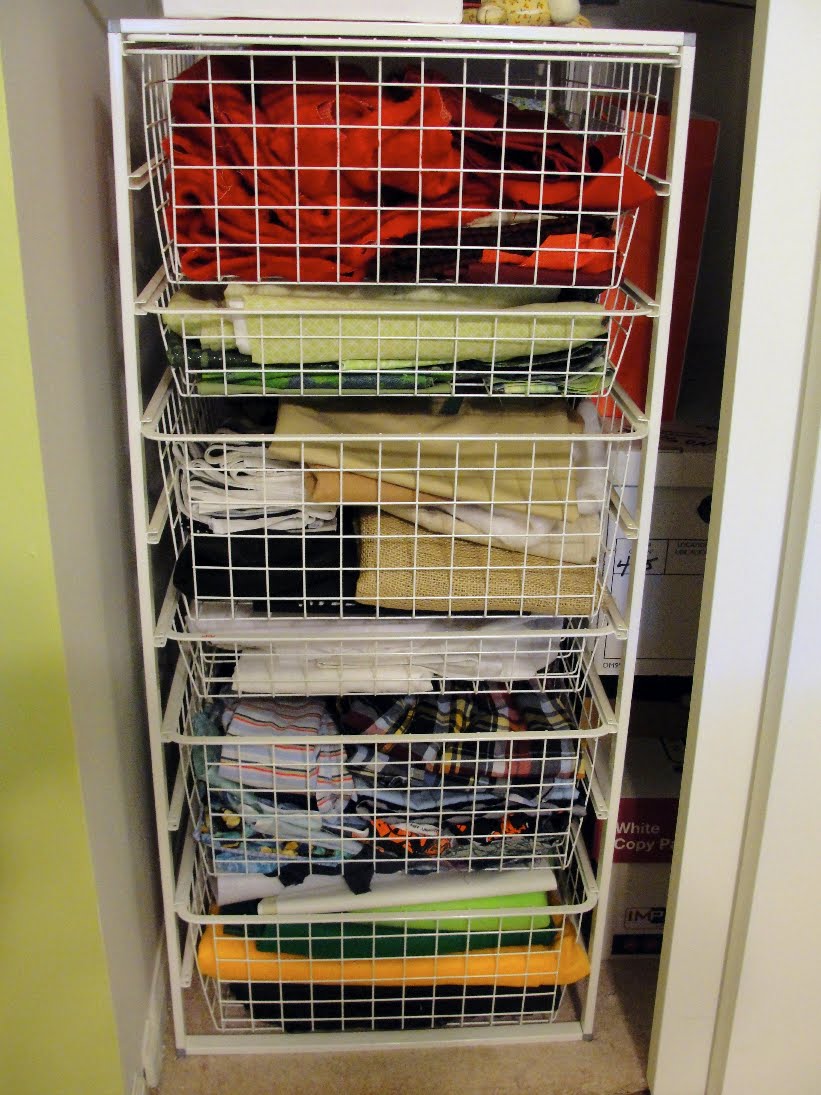
Dorky, but I love our new closet doors! These used to be ugly mirrored doors that made the room look so dated. We updated all the hallway doors to white 6-panel doors, so we decided to coordinate all the closets too.
Not everything in those closets is for crafts (I also keep some older clothes in there), but about half is filled with supplies and I love having them out of the way. The removable labels
were a fun project I did last summer and, of course, they match the bedding too!


Our closets had the Elfa system in them when we moved in, so these wire drawers are perfect for storing fabric. It's so nice to have it all organized instead of in piles and boxes!

So this is my little girly hideout and I love it! It's so fun to work in there with the sun shining in, Kitty sleeping on a bed, and I can watch tv while I work!

Wednesday, April 18, 2012

Braided Fabric Coasters Tutorial

Ok, I'll admit it. I eat in my craft room while I work! Yep, right next to the sewing machine! Sometimes I get Hubby to come in and hang out on the bed while I work, so we'll often have snacks while we work. I get nervous that cold drinks will ruin my desk and dresser, so coasters were in order!
Of course, you know me and everything MUST match, so I used the same fabric from my tissue box cover and curtains. I cut 1/2 inch strips of fabric and used some Elmer's glue to attach strips together. The length of fabric you'll need depends on how big you want your coaster to be. These would also be great for hot plate trivets and you would obviously need more for those.
I took 3 strips and tied a knot at one end.
Then I started braiding the fabric. You can pin the knot to something to make it easier to braid or just hold it in your hands. Memories of those friendship bracelets from day camp, right?
Once the braid was done, I glued the ends together.
For me, it was easier to make a few braided strands and then attach them using glue to make one long braided piece.
Starting at the knotted end, I slowly rolled the braided fabric around to form a circle. I used glue to keep the coil from falling apart. Make sure to let each application of glue dry before continuing to coil or it will fall apart.
And keep coiling and gluing...
Until you get the size you want. It's easy to glue more braided fabric on to the end if you want a bigger coaster.
Once I was done, I glued the ends and trimmed the edges.
Thirsty, anyone?

Tuesday, January 3, 2012

Craft room organization

As I organize my craft room, I wanted to come up with ways to store my supplies so they would be neat, clean and easy to get to.

Remember my last post about the cute labels I made for these plastic storage totes?
DSC01408

I want to show you the rest of the organization ideas I came up with in the room. I filed all my patterns and instructions for projects I've done in these file folders.
DSC01399

When we moved into our house, each room came with a set of Container Store wire drawers in every closet. Score! So instead of having all my fabric in plastic bags and huge boxes, I separated them by color and put them in the drawers.
DSC01401

These are quickly getting filled up!
DSC01402

I love how this looks and everything is so much more accessible.

If you'd like to see some of the other craft room projects I've done, go here for my DIY curtains, here for my sewing desk chair makeover, here for the pretty dresser makeover, and here for the coffee cup flower pot tutorial.

Linking up at these fun parties!

Thursday, March 3, 2011

DIY Throw Pillow to Chair Cushion

DSC01714

Some of you asked about the pillow cushion on the chair makeover I did recently. I wanted to share how I made it.

DSC01517

I bought this really cute & fun bedding for the craft room to use on our two guest beds. I also bought some different throw pillows since they were such a good price. I didn't end up liking how the twin bed looked with so many pillows so I had a couple extras. It took a little trial & error, but I was able to take apart the throw pillow and resize it to fit my chair. Here's how you can resize a large throw pillow to create a pillow cushion...

DSC01523
The throw pillow was larger than the chair, so I had to use a seam ripper to carefully take the pillow apart.

DSC01521
I took out some of the stuffing to make the pillow flatter and easier to sit on.

DSC01527
Then I resized the pillow to the size of the chair, pinned the sides of the cushion, and hand-sewed it closed.

DSC01537
I pinned the trim around the edge that I took off earlier.

DSC01530
To make the chair ties, I cut 4 strips of fabric.

DSC01532
To create each strip, I folded each edge towards the middle, pinned, and ironed the creases. Then I folded again and pressed to hide the unfinished edges.

DSC01553
A simple straight stitch closed the folds and finished the ends. Then I attached the ties to the pillow trim and hand-sewed everything closed.

DSC01554
For the cushion buttons, I bought a button cover kit and followed the package directions.

DSC01557
I marked the center of the pillow on both the top and the bottom and sewed them on.

DSC01653

DSC01652
Here are the finished ties on the chair.

DSC01712
I was so scared to do this project without any idea what I was doing, but I'm so happy with how it came out!

Wednesday, January 12, 2011

Colorful Pin Cushion

DSC01660

How cute is this? I saw a great free pattern from Heather Bailey on her website and knew I had to make one. Of course, it must match the bedding in the craft room because I'm matchy-matchy like that : )

You can download the PDF and make one using her tutorial. It was super easy and I finished one while I watched tv!

DSC01655

Friday, January 7, 2011

Easy Lamp Makeover Tutorial

DSC01708

So here's my old lamp that was in my craft room. I don't even know where I got it...I think it was in my grandparents' house, it got passed down to my parents, sat in their basement for 10 years, and then I took it.

Anyway, it's the perfect size for the room, but the ugly off white shade was just not right. I wanted a bright red to match the bedding.
DSC01608

Solution? Spray paint...or so I thought. It did NOT work well and I didn't get the bright red I wanted.
DSC01650

Plan B was to cover the shade in red fabric. First, I wanted to make sure the fabric was ironed. Any wrinkles in the fabric will never be able to be fixed once it's on the shade.
DSC01699

Then I spread the fabric on a flat surface and slowly rolled the shade around the fabric.
DSC01695

I traced the outline of the shade. Yeah, yeah, still using my pen to write on fabric, but I promise I have real fabric pencils now too! It's a bad habit to break!
DSC01694

Then once I had the outline drawn, I enlarged the shape by 1 inch on each edge so there would be extra to wrap around the inside of the shade.
DSC01698

I cut out the fabric and slowly wrapped it around the shade. Using tacky glue, I wrapped the edges of the fabric to the inside of the shade and glued. It worked best to only do a few inches at a time.
DSC01702

After each section, I let the glue dry. If it works better, use paper clips or binder clips to keep the fabric from moving while it dries.
DSC01706

When the shade was completely wrapped, I folded over the edge to give the overlapped area a finished look. Then I glued the edge closed.
DSC01703

And here's my finished lamp!
It was super easy, took less than an hour, and only cost me a couple bucks for the fabric!
DSC01710

The red fabric could not match any better!
DSC01709
Related Posts with Thumbnails