Showing posts with label family room. Show all posts

Tuesday, June 21, 2011

The Buffet Saga & Makeover

This story could literally be a novel, but I'll try to just get the basics as I explain the saga of the buffet...

Back in January of 2010, we decided we needed a little buffet or cabinet to fit in this area of our family room. After searching for months, I quickly realized that it was impossible to find one in the size and color we needed. I found this small store where you could order pretty much any size wood cabinet and they would finish it in whatever color you needed. Perfect!

We ordered it and were told it would be here in 8-10 weeks. 8-10 weeks came and went and we still didn't have our cabinet. Every phone call to the store was excuses and excuses and they kept saying it was coming on a certain date in the future. The entire summer was spent wondering where the darn thing was!

In August, I called again and no one would pick up the phone. WTF? Did the company close or what? I filed a complaint with the Better Business Bureau and a problem solver column in the Chicago Tribune newspaper. Both did their share of research and were not able to help when we found out the company filed for bankruptcy. Hours spent online were helpful and I was able to find some others who were in a similar situation with this store. I started calling the bankruptcy attorneys to try to get some answers.

Finally, I was told the store had some stock in the back that they never delivered and I could come by to see if my cabinet was there. Luckily, it was there, BUT it was not finished and we paid for it to be stained black. They let me have some free stain and we took it home to attempt to finish it.

So here's a look at our cabinet in the garage when we got it home. Honestly, we figured if we can drywall, tile, paint, and do minor electrical and plumbing, how hard can it be to stain something?
Let's just say it didn't go as well as we expected. Here's a bit of our mess after 3 different kinds of stain plus hours and hours of sanding.

After everything we've been through with this cabinet, we were fed up! We gave up and decided to paint it black. And even that didn't go as planned! The garage was too dusty so we had to bravely paint with black in our living room!

FINALLY, months and months later, here's our finished buffet in it's spot in the family room.
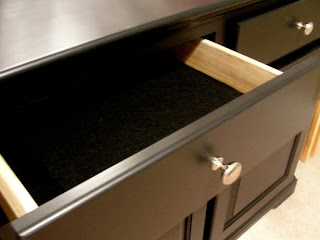
I covered the bottom of the drawers in black felt so we can store our China and other serving pieces in there.
And of course, some fun accessories!

So glad to be done with this!

Thursday, March 10, 2011

Family Room Window Transformation

I don't think I ever shared this makeover, so I wanted to post some pictures. This was our scary family room when we moved in last year. Yes, the carpet was new, but the rest of the room was still stuck in the 70's!

As the first task when we moved in, we pulled down the nasty paneling and trim around the windows. I'm so proud of my hubby for spending many of his days off of work building beautiful trim around the windows to dress them up.


And here they are!
DSC01931

DSC01932

DSC01934

They took some getting used to, but we love them now. It's so fun to sit on the couch and look out the window at all the hard work we put into making these windows beautiful!
DSC01933

Monday, January 17, 2011

Amazing Fireplace Transformation


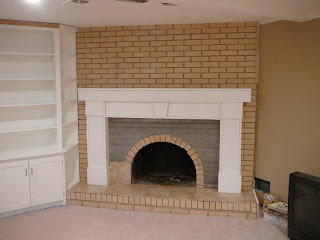
This was our fireplace when we moved in to the 70's-tastic house. Even when we first walked in to view the house before buying, we knew it had to go QUICKLY. But this was not the best task to start with when we moved into the house. This fireplace was a HUGE undertaking and a lot more work than we originally thought. Basically, we wanted to cover up the ugly brick and build a mantle that would match our style. Sounds pretty straightforward, but it definitely wasn't!

If you want to see all of the horrible, but hilarious problems we went through, see this post.

We started out by building a mantle. The challenge was that we had that concrete slab in the middle of the wall that needed to be covered. The mantle had to be built around it so it would hide inside.

Instead of tearing out the brick, we covered the brick in drywall and then added durock in the area we wanted tile. By this time it was the middle of the winter and let's just say it was pretty cold working in a room with no cover on the fireplace! We had to start building fires when we needed things to dry or it would take forever! We tiled the hearth and area around the fireplace opening with a simple tan-colored tile to match the wall paint.

The next big challenge was how to add the tv, dvd player, cable box and all the wires without having stuff everywhere. I'll give Hubby all the credit on this as he was able to come up with a sneaky solution to this problem.

The solution: the room next to the family room is the laundry room and there was a little area of a closet that had no purpose. So we wired all of our component through the wall to these little shelves that Hubby built. Eventually, we'll redo the laundry room and make them pretty, but for now, this works great.

Here is our finished tv and mantle! As you can see, we also added crown moulding around the entire room and above the tv to give it a more finished look.
DSC01938

We have a remote that works through the wall so we can change channels with the cable box being in another room.
DSC01928

I love our tile choice. It looks great with the color of the wall and it's not too distracting from the mantle and tv.
DSC01940


DSC01929

Also, notice my initial fame on the right side that I made earlier in the year.
Go here for my tutorial.
DSC01936


Wednesday, October 13, 2010

Simple Leaf PIllow Tutorial

I was walking through Walmart and saw these cute leaf placemats for $3. I showed Hubby how I read on Tattered & Inked that Kelsey took 2 of them and sewed them together to create a pillow.

Anyway, he convinced me to make one for our house...he always makes me buy things when we go shopping! He came up with a way to make the pillow even cheaper by using only 1 placemat instead of 2. See how my crafty creativity is rubbing off on him?

So here's my placemat before. I used the seam ripper to rip out some of the stitches attaching the leaf to the back of the placemat.

Then I stuffed it and pinned it back up.
It took a couple minutes to sew the hole closed.

Voila! New fall pillow in 15 minutes!

Friday, October 8, 2010

Amazing Bookcase makeover

Yikes! This is even embarrassing to post!

Here's our old family room built-in bookcase when we moved in last September. At first, we were going to rip it out entirely, but then we decided it was a great place for storage and we could probably transform it easily.

5 coats of paint and many days of frustration later, here's our painted cabinet.
The next huge task was filling the bookcase. It didn't seem like something too difficult, but once I started adding things, I realized how HUGE it was and how long it was going to take to fill it.

This is definitely a work in progress as I collect more accessories and books to add to it. I change up the little collections every few weeks when they start to bother me!
DSC01920

The Willow Tree angel collection was also a challenge. I was really into these in college and right after, but it got to the point where I had way too many and I didn't know what to do with them anymore. I put them in a box for a year and then pulled them back out for the bookcase. My randomly placing angels throughout the bookcase, it's not as overwhelming as the whole collection together.

And no, I'm not PG again. That's our angel from earlier this summer with the Willow Tree figurine my mom gave me the day of the surgery.
DSC01922

I chose to take the paper covers off all my books and only use hardcover books. I think it looks cleaner, but it also means it's going to take much longer to fill. I usually only buy paperback because I like to fold the books when I'm reading.
DSC01923

I also tried to keep with the color scheme of the room so all the photo frames match the other accessories in the room.
DSC01924

Some of the little accessories and bookends are from my spray paint extravaganza which you can read about here.
DSC01925

Big transformation, huh? We love it!

See the fun parties I'm linking up to here

Friday, July 9, 2010

Initial Frame Revamp

Team T's newest piece of art! See how I did it below!

I saw this hanging frame at the thrift store a few weeks ago for $2 and I knew it was perfect for an easy revamp.

I started out by taking out the insert and spray painting the outer frame red. Unfortunately, the paint didn't cover correctly and I got a funny texture. I tried to sand it off for a more antique look which is cool, but it doesn't match our style at all.
So my resolution was to cover the frame in this pretty textured paper!
I traced around the frame to get the size.
Then I cut out the paper and used spray glue to adhere it to the frame.
For the frame insert, I found this pretty damask paper.
Then I hot glued the wood letter to the frame.
Super easy and a big transformation!

Now I can't decide if I want to lean it on the mantle....
hang it on the wall...
or set it on a plate stand...
Linking up to:
New Friend Fridays
HookingupwithHoH


504 Main
Just a Girl's Show & Share Day
Frugalicious Friday

Related Posts with Thumbnails