Showing posts with label summer. Show all posts

Thursday, July 3, 2014

4th of July Baby Footprints Craft

Baby's first craft!

I did so many little foot and handprint crafts with Connor, so I wanted to make sure I do some with little Caylee before I get too busy.  This super easy painting project turned into a huge mess, but at least it came out cute!

The mess: I usually do painting crafts in the bathtub to make clean up easier with a kid.  However, I forgot that I usually leave their diaper ON until we're done and ready to turn the water on.  So right after I painted her foot, we had a big "code brown" all over the tub.  And then to add to the chaos, Connor put liquid soap all over his hands to help clean up, but rubbed it all over the carpet!  So my plans to do a bunch of versions and use both feet didn't work so well, but at least I got one foot!

Hope you all have a happy 4th with your families and friends!

Friday, August 30, 2013

Sesame Street Birthday Party DIY

My little guy just turned 2!  (They grow up way too fast!)  I wanted to share some of the cute decorations and designs I made for his Sesame Street party.

I designed invitations and backed them on colored cardstock.  I also printed matching address labels for the envelopes.  (My trick to save money is to buy a package of colored card stock and cut them to size rather than buying individual sheets from a craft store.  I save a lot of money and then I have leftover cardstock to use for other projects.)

Party hat with a yarn pom-pom


Noise makers - not just for the kids!

I took off the fabric garden flag we had up and replaced it with a sign backed on cardboard.  Of course, this wouldn't work in bad weather, but it was a perfect day out.

Front door sign

Right inside the front door, I set up a little table with balloons, Sesame Street characters, goody bags, and noise makers.  On the wall, I hung up photos from the year with the month written on each one so guests could see how he's grown during the past year.


Happy Birthday banner and colored streamers in the kitchen


Chocolate-covered pretzels are always a hit at every party we have!

Cookie Monster and Elmo fruit platters

Rubber duckies swimming in blue jello

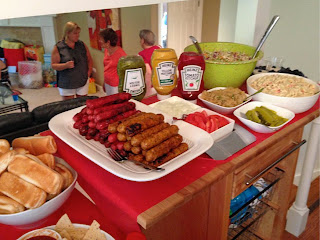
We decided on a hot dog buffet for dinner because it's one of Connor's favorite foods.


I put all the utensils in the Elmo basket and hung balloons from the handle.

The one thing I didn't make was the cake, but the bakery did a great job on it.  Connor was so excited when he saw a giant Elmo on his cake!

It tasted good too!

We had a great time and Connor was such a big boy!


Tuesday, July 23, 2013

How to Sew Straps on a Toddler Hat


Do you have a toddler who loves to take their hat off and throw it?  I do!  If I can distract him, he'll keep it on, so any help I can get with velcro straps are always appreciated.  It seems like most hats bigger than about 12 months don't come with straps (why not?) so I had to add my own to a couple of his summer hats.

I used one of the hats that does have straps as my guide when making my own.

I measured the straps on the hat above and used that number as a guide.  I added a couple extra inches onto my measurements and I could always cut them off later.  Better safe than sorry!  I cut two long pieces of fabric that were about 10 in. x 2 in.  I folded each one in half longways and pinned.

To get a good crease, I ironed the strips.

Once the fabric cooled, I opened the fold and then folded each edge in towards the middle (where the ironed crease is).  Again, I ironed the fabric.

After the fabric cools, fold each side in towards the middle again and you'll have a perfect crease. 

I took each strap and sewed a straight line down the side to keep the crease closed.  Then I added a little piece of velcro to each strip and sewed it on.

The tricky part is figuring out how long each strap needs to be to fit the child.  I used my hat with straps (shown above) as a guide and then tested it on my son to make sure it fit.

I cut off the excess fabric on each strip and then folded over the edge.  A couple stitches on the sewing machine was an easy way to attach the straps.

Here he is modeling his new hat on the 4th of July!

He actually loves wearing it too!

Thursday, July 18, 2013

Beer Chelada

I'm in shock that it took me so long to hear about this! I was at a Mexican restaurant, saw a beer chelada on the menu and I decided to give it a try...Yum!  How could I have been missing out for all these years? 

Ingredients:
• light beer
• lime juice
• fresh lime
• margarita salt/coarse salt

Take a damp paper towel and wet the rim of the glass.  Dip the top tip of the glass in salt.

Carefully pour in a little lime juice. (I'd suggest tasting and adding more if you like your drink more sour.  I think I used about a tablespoon.)

Fill the rest of the glass with beer and top with a fresh lime for garnish.

The perfect summer drink!


Wednesday, July 18, 2012

Happy Little Pleasures - Summer Edition

Another feel-good post to remind myself of some of the happy things in my life...
Bare feet
But only pretty ones...You know you've seen some nasty ones out there! I love when it's sandal season. Socks suck, so I'm into flats and sandals as soon as possible and I'm the last one in the fall to go back to boots. At work, I take off my shoes and walk around barefoot just because I can.

The refresh option on the dryer
This is an amazing invention. When I met Hubby, he got me into ironing. He ironed everything! I never really touched an iron unless I needed it badly. So the more he got me into it, the more I felt I needed it. I air-dry most of my clothes so they're extra wrinkled once they dry. I used to spend hours watching tv while I ironed my clothes...until we got our new washer/dryer with this convenient function! I pop all my wrinkled clothes in for about 10 minutes and they come out almost wrinkle-free! A few things might still need a quick iron, but it's way less time-consuming than before.
This adorable smiling face
No explanation needed. You know why.

A good doughnut
When you're having a bad day at work, nothing can cheer you up like a freebie doughnut someone brought in. Yum.

Birds singing
I absolutely love that sound in the morning. Hearing it makes me think of summers growing up. I live in the same neighborhood I grew up in so it's that exact same sound I used to hear as a kid. I felt so strange in college when I didn't hear that noise in the morning!

What are you happy little pleasures for summer?

Sunday, August 21, 2011

Still hanging in there...

After the nursery reveal post, some of you have asked about labor progress and if the baby is here yet. I'm officially due on Wednesday, but still have an inside baby as of now.

If you would have asked me a week ago, I would not have been ready and I could have gone on for weeks. But now, I'm totally ready and getting impatient! As much as I would have liked to finish the house projects we've had going on this summer, it's not going to happen. With the basement flood, power going out for days at a time, and me being a whale, they just didn't all get finished. I'm at a stopping point (as much as I don't like things unfinished) and I'm ready for our little one to join our family.

Like I've said before, this blog is meant to be about crafts, recipes, projects, and fun things that make me happy. I have another baby blog that will probably turn into a "Look how cute my baby is!" blog. It's private, but I'm happy to give anyone access that wants to read it (just send me your email address). Hopefully, my baby will sleep lots (I can dream!) and I can be on here blogging away as usual during my maternity leave.

Hope everyone is enjoying that last little bit of summer! I'll keep you posted!

Wednesday, June 15, 2011

2011 Summer Wish List

I did this last year so I figured it might be fun to do it again.

First, I'm going to look at my summer of 2010 list and see how much we actually did. (This might be embarrassing...) Unfortunately, the summer didn't turn out as planned and we had some hard times, so some of these got put on the back burner as we coped with it. But we did still accomplish a lot of them!

1. go for a bike ride - I did in the driveway...does that count?

2. dine al fresco - I know one time we went to the KFC drive-thru and then brought our food to the forest preserve and ate it while we watched the Des Plaines River. We also had a picnic at Carved Rock in Rockford, IL and I took a bunch of pretty pictures of the sailboats.

3. have a cigar night in the backyard (kind of an inside joke b/c we did this at our old house on the balcony off our bedroom one day) - This never ended up happening. However, this year, Hubby has already checked this off his list.

4. buy ice cream from the truck that drives around our neighborhood every night - I know we never did this, but we did go to Dairy Queen a few too many times!

5. run my first 5k race (as long as my body isn't broken) -
I missed my first one when I found out I was pregnant, but I did do it later! So happy about this one!

6. do cartwheels in the grass like the neighborhood kids - Not that I can remember, but I bet I did while Hubby was mowing the lawn and laughing at me.

7. feed ducks in the park (I'm supposed to do this alone because I was told I am too old for this) -
While we waited for my D&C surgery to be scheduled, I wanted to get out of the house, so I convinced Hubby to walk around the lake by our house with me. I brought bread and fed the ducks and geese (who chased after me once I ran out of bread). I also spent way too much time in the petting zoo area at Brookfield Zoo feeding and petting the animals like I was 4 years old.8. go to a tapas restaurant - We went for our anniversary in August. Here I am posing with my anniversary gift before dinner. Yeah, I'm a dork.
9. hit up my usual summer craft fairs - Done, but I don't think I bought anything

10. do something fun for our anniversary in August -
Done! See #8


So for this year, our plans will be a little different now that we have a little boy coming! But there's still so much to do!


1. Have a healthy baby boy in August (or September if he's late!)

2. Bring back #4 from last year. I must buy ice cream from the ice cream truck. I have now been told I have a 6th sense for when it's coming. I can hear that song in the house with the a/c on and the tv blaring!

3. Dine al fresco as we did last year as well. One of my favorite things to do!

4. We've been going crazy trying to get things done in the house before the baby comes. I really want to have all our new doors & trim installed by the time he's born. Then it will be time for a major home renovation break.

5. Get the nursery finished. It's our priority before the other house projects and it's on its way to being completed.

6. Start trying to do some cooking again. I went through a lazy time when I just didn't have the energy, but I'd at least like to try some new recipes during the summer when I'm more motivated.

7. Continue trying to work out a few times a week. I've cut down from my hardcore 5x a week, but 2-3 is good for me. Hopefully, I can keep it up until it's really uncomfortable.

8. Enjoy myself and relax as much as possible now. Our lives will never be the same again!

Wednesday, July 14, 2010

Summery Garden Flag


Ever notice how those store-bought outdoor seasonal flags all look so cheesy? I bought this flag pole years ago, but I never found a flag that I liked enough to actually use it. Until now! I realized I could make my own!

I was at Joann's the other day and I found these discontinued outdoor upholstery sample swatches on clearance for $1. Perfect! I would definitely suggest using fabric that can handle the weather or your flag won't last very long. I also found some matching nylon fabric that would also be able to handle the Chicago weather.

I designed this flag to have a quilt-like look, so this is the layout I worked from.
(Darn, I worked so hard to get these to enlarge when you click on them and now it's not working. If you want a pattern, just email me!)
To follow this design, you'll need:
(using a 1/4" seam allowance)12.5" x 20.5" nylon for the back
Two 2" x 16" nylon strips for the sides
2" x 12.5" nylon strip for the bottom
3.5" x 12.5" nylon strip for the top
9" x 16" upholstery fabric for the middle section
extra nylon for applique letter
matching thread

First, I cut out all my pieces and pinned the side strips to the middle section. Sew using a 1/4" seam allowance.

Then I pinned and sewed the top and bottom strips on. Note that the top strip is taller because it will be folded over later. Press open seams with a warm iron.

I printed out my letter T on the computer in a simple font. Then I placed a piece of nylon on top and traced the outline of the letter.

To stiffen the letter, I ironed a thin piece of interfacing on the back.

To applique the letter onto the flag, I set the sewing machine to a zigzag with the stitched very close together. It took a couple tries to get the ideal size stitch, so I would suggest playing with it beforehand.

Pin the letter securely to the flag.

Carefully stitch around the letter. This was pretty scary for me because it was my first real applique, but it wasn't nearly as hard as I thought it would be.

Once I stitched around the entire letter, I left some extra thread hanging so I could tie off the ends. I used a needle to bring the extra threads to the back side of the flag.

Then I tied a few knots to hold the stitches in place.

To attached the back side of the flag, I pinned the back piece to the quilted front piece with right sides together. Then I sewed around 3 sides, but left the top open. Flip the flag around so the right sides face out and press with an iron.

On the top of the flag that was still open, I folded over about 1/2" and pinned.

Then I folded over another inch and pinned. Sew across the width of the flag using a straight stitch and be sure to reinforce at both ends. This will create the pocket for the flag to hang from.


So happy with how this came out! I can't wait to make another one!

Linking up to:
Photobucket

Wallet-Friendly Wednesday

CreativeShareWednesdays


Life in the Pitts


Make it Yours @ My Backyard Eden

Frugal Mom x 3
Related Posts with Thumbnails