Thursday, February 13, 2014
Toddler Straw Valentines

Monday, April 1, 2013
DIY Embroidered Luggage Tag
 I always see these cute luggage tags in stores and they charge so much for them. Why pay a lot when you can make them yourself? I decided to make one for my sister and one for Connor to hang on his backpack for daycare.


Monday, November 19, 2012
FREE personalized card!
:::raises hand:::
Me! Although, I really, really tried to plan ahead and get things done early this year so I don't get too overwhelmed.
Check one thing off your list early with a FREE personalized greeting card from Treat!
Maybe you need a card to say thanks for the yummy Thanksgiving meal, to wish a relative a happy birthday, or simply to spread the holiday cheer, Treat lets you create a one-of-a-kind card that will bring smiles to any recipient.
Treat is offering one FREE personalized card good only on Monday 11/19 & Tuesday 11/20 for readers of The Pursuit of Happiness using the code TREATBLOGR.
* * *
Enjoy & have a wonderful Thanksgiving!
Lisa
This post is sponsored by Treat.
Thursday, September 6, 2012
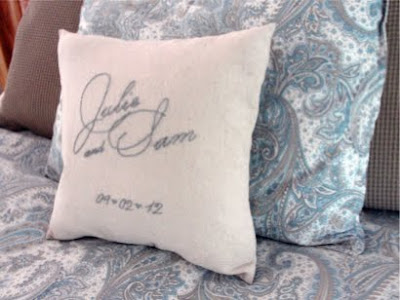
Embroidered Wedding Gift Pillow

I bought a pillow insert at the craft store and designed the lettering to fit in the space.
 I printed out the monogram and the date we used on her programs, placecards, etc. and pinned it onto the muslin fabric I chose to match their living room decor.
 I used gray embroidery floss to embroider the lettering onto the fabric. I leave the paper pinned onto the fabric until I'm done. Then I carefully rip the paper off and it looks perfect!

 I gave it to her at her bridal shower and it was a big hit! I can't wait to see how it looks on her couch!
Wednesday, July 11, 2012
DIY Wedding Shower Ideas
For her shower, I designed these umbrella invitations and backed them in different colored pieces of cardstock because I couldn't decide on just one!


I created a Mad Libs-style letter for each guest to fill out. Everyone seemed to have a great time combining some funny comments with the happy well wishes.


Tuesday, May 1, 2012
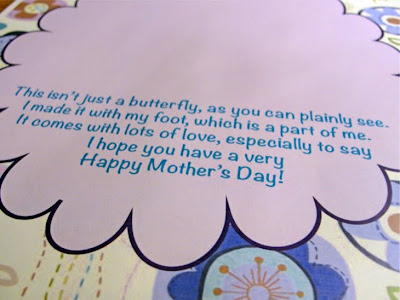
Mother's Day Butterfly Footprints

Connor and I did another quick craft together and I quickly learned how much harder this is going to be as he gets older. Now that he grabs at everything, using paint is much more of a mess!
 As usual, we do this in the bathtub so he can get cleaned up right away.
  I stamped his feet on some colored cardstock and cut them out. I also cut out little butterfly bodies and used some silver pipe cleaners for the butterfly antennae.
 I printed out this little poem and left a space to attach the butterfly.
 I also wrote "Love, Connor" and the date on the bottom.

Monday, October 31, 2011
Planning for the holidays
I'm super excited to send out our first-ever photo cards showing off our new little bundle of joy! I've been racking my brain trying to come up with some fun photo ideas. What mom doesn't love taking tons of pics of their little one and dressing them up in cute outfits?
Because we're a mixed religion household, it can be hard to find cards that all our family & friends can enjoy. However, Shutterfly has a lot of options that I really love. I'm thinking about one of the holiday cards from here such as:
And while I'm ordering, I may have to get a cute photo calendar for my desk at work because a mom can never have too many photos of her baby! If I have to be back at work, I need to have lots of pics of the little guy around me.
 Just to make things even easier, I'm thinking about buying some personalized photo gifts this year for family & friends. I gave a few of these out last year and everyone loved them!
Monday, December 20, 2010
Cinnamon Sugar Almonds
 Ever seen those cinnamon sugar almond carts in the mall and they smell SO good? I always want to buy some when I walk by and smell that cinnamon scent. But why deal with the mall crowds when you can make them yourself?
I served these at 2 parties and everyone thought I bought them! They were THAT good! They also make the house smell amazing : )
Adapted from here
Ingredients:
• ⅓ cups & 2 tablespoons water
• 1-⅓ cup sugar
• 1 teaspoon cinnamon
• 2 cups almonds (Cashews also work. I made a batch of those as well.)
• 1 teaspoon vanilla
In a saucepan, add the water, 1 cup of sugar and the cinnamon and stir. Bring it to a boil over medium heat. Be sure to keep mixing so it doesn't burn or stick to the bottom.
Add the almonds, raise the temperature to high and keep stirring constantly until the water is boiled away.
Turn the heat back to medium-low to keep the sugar from browning too fast. Keep mixing until the almonds start to have an even shiny coat.
Add the rest of the sugar and the vanilla and keep stirring. There may be some popping when you add them, but that's perfectly fine!
Keep stirring until the almonds are shiny, but still a bit lumpy with clumps of sugar. When this starts to happen, take them off the heat and pour them on sheets of parchment paper. Let them cool completely before serving or storing.
Pig out!


