Showing posts with label winter. Show all posts

Thursday, December 4, 2014

DIY Sew Toddler Stuffed Christmas Tree and Ornaments

This was definitely a labor of love project!  2 years later, I finally have something I can show off.  I believe I started this right after Connor's first Christmas when I had the great idea that he could decorate his own child-proof tree the next year.

I started out with some fleece and made my famous stuffed tree, but a giant version that was much bigger than the normal 10-12" one.

The star was the hardest part.  I had to find a way to get it to stay on and be child-friendly.  Using a party hat and a star cut out as my inspiration, I created a felt version that fit on the tree.

It took a few attempts to get it to work, but I figured it out eventually.


I used a blanket stitch around the outside edge of the star.


The ornaments were the hard part, but I wanted to go all out with these.  I did some sketches of the ideas I had, so I would be able to plan the designs.


Seriously, these must have taken months to finish, but the end result was adorable.  Each one has little buttons and hand-stitching on it.


To get the ornaments to stay on the tree, I added big buttons to each tree branch.


At some point, I finally finished this thing and put it in the basement with the other holiday things.  I got busy and forgot about it until the other day when I found it!  Connor is the perfect age for it now and I'm so happy I have it for him!


He loved decorating it!

Monday, January 7, 2013

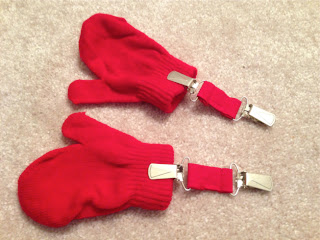
DIY Sew Childrens' Mitten Clips


If you've got young kids, you probably deal with missing mittens and gloves all winter long.  I really didn't think I'd have this problem with a 16 month old, but a little toddler is not really ready to keep track of his own mittens at daycare!  Anyway, these old school mitten clips I made him have made my life a lot easier and I'm not freaking out about missing mitten every other day.  Once I made a set for him, I'm happy to say we haven't lost a mitten since!

This whole thing took me about 15 minutes - max!  I cut out a long piece of fabric that was about 3 in. x 16 in.  I folded it in half longways and ironed the crease. (You could also use ribbon to avoid doing the fabric and ironing, but I feel like fabric is a little better for a rough boy!)


Once the fabric cools, fold both ends towards the middle crease that you just made and iron again.  Now you have a thin piece with the unfinished ends hidden.


Pin the fabric strip along the edge and sew the edge to close it.

Once the strip is sewn closed, I cut it in half so I had two shorter 8 inch pieces.

I bought 4 mitten clips at the fabric store.  They're usually located near the sewing supplies like needles, snaps, and zippers and come in sets of two.

Wrap the end of each strip around the mitten clip and fold the unfinished end under.

The length of the fabric really depends on the age of your child and how long you think would work best.  Since my son is still pretty young, I made the straps really short and cut off the excess fabric.

After pinning the fabric, I sewed each side on the machine.  It's a little tricky to get the tiny pieces to go through the machine, but I got it to work.

Super easy and they're so cute!


Here's my little model showing off his new mitten clips! 
Aren't kids with mittens adorable?

Tuesday, December 11, 2012

DIY Stuffed Fleece Penguins

Aren't they the cutest? 
 I'm so in love with them!

I can't take credit for this pattern.  I used a book called Wild and Wonderful Fleece Animals by Linda Carr.  The penguin pattern comes in the book and then I enlarged the pattern to make them much bigger.  I also added the glittery silver ribbons around their neck to make them a little more festive.


They're so adorable on by the fireplace for the holidays!


Monday, November 12, 2012

Holiday Card Time!

It's that time again!  I'm getting excited and working on ideas for our annual holiday card. As usual, I takes me numerous hours to pick out and perfect our card. :)  As a graphic designer, I'm kind of picky about the design of my cards, but I'm always so impressed by the designs that the Tiny Prints designers come up with. (Umm, can I work there? LOL!)  There's so many great ones that it's hard to choose just one!  And since we celebrate both Hanukkah and Christmas, I always want to find something that I think works well for both holidays and their traditions.

So here I go...off to decide which of these gorgeous holiday cards we should use this year!


 Maybe one of these?


BTW, who wants to pay full price for holiday cards? Not me!  Check out these great promotions and deals here.  Snatch them up before the expire!


This post is sponsored by TinyPrints

Tuesday, December 14, 2010

Festive Stuffed Christmas Trees: Part 2

You may have seen my first post about the popular stuffed trees. Go here for the tutorial and to see some of the holiday fabrics.

I wanted to show you some of the other fun fabrics I enjoyed using to make trees.
The muslin tree came out so cute and it's perfect for a shabby-chic look.These Bears trees were a huge hit at work and with my friends. I bet I've made at least 12 of them for friends and coworkers.
I live in Bears country, but there are a few Colts fans who asked for their favorite team.
If you'd like to see the tutorial for the trees, stop by here.

Linking up here

Friday, December 10, 2010

Festive Stuffed Christmas Trees

I came up with this pattern a couple years ago for a craft fair and it turned out to be really popular. By using all kinds of different fabrics and colors, the trees appeal to everyone! Maybe I should be keeping my tree design a secret since it's so well-loved, but I've been asked to share it with you.

Start out with this tree pattern. Re-size as desired and print out a copy. The size I usually use is about 11 inches tall. Smaller trees can be hard to stuff.
Trace the pattern on fabric and cut out the pieces. You'll need 4 pieces for each tree.
Pin right sides together and you'll have 2 sets of trees.
Sew along the edges, but not the bottom using a .25 inch seam allowance.

Turn the trees right-side out and press all the seams flat. This will make the next step much easier. (Yes, I have a leopard print ironing board cover. My purchase was not appreciated by Hubby!)Place the two trees on top of each other and line up all the corners. Measure down the middle and mark with pins.

Sew along the middle of the trees and you'll end up with 4 sections as shown in the picture.
Stuff each of the 4 sections.
Pin each section closed.
Hand sew the bottom.
Add any embellishments such as ribbons, bells, etc.
This is my favorite: Ho Ho Ho!
Also super cute in fleece for kids!
And more of a winter theme...

Stay tuned for part 2 of this tutorial with more fun fabrics!
Related Posts with Thumbnails