Showing posts with label bargains. Show all posts

Monday, November 21, 2011

DIY Brooch Bracelet

I hope you stopped by Bella Before and After where I was guest-posting on Friday about these super easy brooch bracelets I made. Bella is such a sweet blogger that I've gotten to know during the past year or so. Be sure to stop by and check out her fabulous blog and link up to her Amaze Me August link parties every Tuesday.

Photobucket

If you didn't catch my post, here's a recap...
I was out shopping one day to find some jewelry for a dress and I came across this really cute idea. There was a whole display of beaded bracelets with a really pretty brooch holding them together. I had no idea it was a brooch until I really took a look at it when I tried it on. Very cool idea and most of us can make them with things we have at home already!

If you're like me, you save your jewelry through the years and never want to throw it out. I only wear my favorite things, but I save a lot of it in case it comes back into style or I have something that would match it perfectly. I had some of those groups of beaded bracelets that were so popular a couple years ago. I found 3 or 4 bunches that I've collected in the past 10 years.
I also had some pretty brooches that I've collected over the past 10 years. I even found one that my mom gave me from the early 90's! It's so simple to just clip it on to some bracelets and you have a cute new accessory!
These rhinestone bracelets are probably 11 years old and the brooch came from some blazer I bought maybe 5 years ago. But together, they're so fun!


This is the brooch from my mom that she used to wear years ago. I paired it with these fun gold, pearl & rhinestone bracelets from Forever 21.

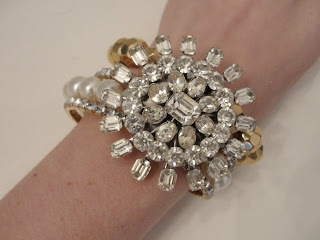
Can't beat a craft that takes 2 minutes and gets tons of compliments!

I also want to send a quick HAPPY BIRTHDAY to my Hubby today! Love you!

Tuesday, July 5, 2011

Cute Fleece Dog Bib

I might be going a little overboard with the bib crafts, but they're all so cute! And maybe this isn't the most practical bib, but I couldn't resist trying it when I saw it!

Adapted from the book, Sewing for Tiny Tots by Susan Cousineau. My bib design is based on the book, but adjusted slightly to make it my own.

I mentioned in a previous post that it's way cheaper to buy an old piece of clothing from a thrift store rather than off the bolt at a craft store. Plus, I love that this is already worn in and won't pill as much right away since it's been washed multiple times already.
The book gives you a pattern that you can copy and enlarge to the size you want. The book suggests enlarging it 400%, but that seemed huge to me, so I cut it down to 300% for a newborn.
I cut out all the pieces from the fleece shirt and a scrap of felt.
I used a blanket stitch to outline the felt pieces for the spots and nose. The book suggested basting all the felt onto the dog face, but I felt like fusible webbing would work much better. I traced the felt pieces onto the fusible fabric and ironed them onto the face and ears.
Sewing the mouth onto the dog was a little tricky for me and I forgot to take pictures because I got so frustrated. I couldn't come up with a good way to get the lines onto the fleece so I would know where to sew. My final solution was to use a piece of tracing paper with the face drawn on it. I pinned the tracing paper to the fleece face and sewed right through both pieces. Then when I was done, I ripped the tracing paper off.

The eyes were another tricky thing. The book suggested using embroidery stitching or felt to make them. I really didn't want to mess with that after the tracing paper fiasco above. I found these doll eyes at the craft store and they worked great. Hubby cut off the ends with a pliers so they didn't stick out so much. Buttons would have worked well also.

I thought it might be fun to use some ribbon as the closure at the back of the bib rather than the usual velcro. Then the size can also be adjusted as the baby gets bigger.

A LOT of work for a bib that's just going to get dirty, but it was fun!

Tuesday, May 10, 2011

A Crafting Secret

Fabric can be really expensive. Even with those 40% off coupons or a good clearance, some of the specialty fabrics cost way more than they need to.

So here's my secret to save you money on your fabric purchases:

Buy things from the thrift store and reuse them!Fleece can be pretty expensive to buy, but this huge men's fleece sweatshirt was more than enough for my project and it was less than $2!

Denim is great from old jeans and it's already nice & soft.

I've also used bed sheets for large projects like quilts. Just make sure they're not too stretchy unless that's what you're going for.

Old t-shirts & blouses are perfect to turn into scarves too.

The possibilities are endless and you'll save so much money!

Wednesday, February 9, 2011

Placemat Makeover

We have a glass kitchen table and it gets scratched really easily. I like to keep placemats on it to keep it a little more covered. We've had these nasty red plastic ones that I got at Big Lots a few years ago and I always meant to buy new ones. (Don't make fun of me, I took this photo back in the fall.)
I haven't really seen anything I like that much in the stores and I want them to be wipeable in case we spill. So I found these wooden weaved mats at Joanns on clearance for $1! Cute, but they don't match at all. I primed and spray painted them and then added a glossy finishing coat.
Here they are on the table! SO much better and much more modern!


Friday, January 7, 2011

Easy Lamp Makeover Tutorial

DSC01708

So here's my old lamp that was in my craft room. I don't even know where I got it...I think it was in my grandparents' house, it got passed down to my parents, sat in their basement for 10 years, and then I took it.

Anyway, it's the perfect size for the room, but the ugly off white shade was just not right. I wanted a bright red to match the bedding.
DSC01608

Solution? Spray paint...or so I thought. It did NOT work well and I didn't get the bright red I wanted.
DSC01650

Plan B was to cover the shade in red fabric. First, I wanted to make sure the fabric was ironed. Any wrinkles in the fabric will never be able to be fixed once it's on the shade.
DSC01699

Then I spread the fabric on a flat surface and slowly rolled the shade around the fabric.
DSC01695

I traced the outline of the shade. Yeah, yeah, still using my pen to write on fabric, but I promise I have real fabric pencils now too! It's a bad habit to break!
DSC01694

Then once I had the outline drawn, I enlarged the shape by 1 inch on each edge so there would be extra to wrap around the inside of the shade.
DSC01698

I cut out the fabric and slowly wrapped it around the shade. Using tacky glue, I wrapped the edges of the fabric to the inside of the shade and glued. It worked best to only do a few inches at a time.
DSC01702

After each section, I let the glue dry. If it works better, use paper clips or binder clips to keep the fabric from moving while it dries.
DSC01706

When the shade was completely wrapped, I folded over the edge to give the overlapped area a finished look. Then I glued the edge closed.
DSC01703

And here's my finished lamp!
It was super easy, took less than an hour, and only cost me a couple bucks for the fabric!
DSC01710

The red fabric could not match any better!
DSC01709

Friday, November 5, 2010

CREATE a mini canvas & easel

On one of my many trips to the thrift store, I came across this cute canvas and easel for $2. I love the typography and it's really pretty, but it won't match a thing in my house. I've been saving it until I had a place for it. The craft room turned out to be the perfect place and it goes with the craft theme.
DSC00701

I really liked the typography as I said, so I followed the idea and change the word to CREATE to go with the craft theme. I did a quick design on my computer and printed it out to the size of the canvas.
I used primer to cover the pink canvas and spray-painted the easel red. While that dried, I worked on getting my word ready. To transfer the word to the canvas, I put the paper up to the window (my ghetto light table) and traced the back of the letters in pencil.
DSC01174

Then I taped the paper to the canvas and used a pencil with no lead to rub over the words. The pencil transfers to the canvas very easily.
DSC01176

Here's the canvas with the transferred letters.
DSC01178

It took some mixing, but I matched my paint colors to the blankets in the craft room. Using a small brush, I painted the letters.
DSC01179

And here's me hard at work (don't mind the nasty hair and pajamas!)
DSC01181

Once I was done painting, I decided the edges needed some fancy trim. I hot glued purple ribbon and green rickrack around the edges.
DSC01202

And here it is! It's going to look so cute in the craft room!
DSC01604

DSC01606

DSC01605

Check out these link parties I'm heading to!

Friday, September 3, 2010

Thrift Store Chair Makeover

DSC01712

When I started working on my craft room, I knew I needed a cute chair for my sewing desk. I got really sick of rolling my computer chair back and forth every time I wanted to sew. So I found this cute wood chair at Salvation Army for $3 and I knew I could fix it up!

As you can see, it was all scratched, had stains and paint all over it, and just needed some TLC.

I started out by sanding it with a fine grit paper.

Then I used a tack cloth to clean up all the dust. Do you know how much I HATE tack cloth? That stuff is gross and it feels so weird to get all over your hands. I had no idea what I was in for when Hubby suggested I use it.

Then I did a second sanding and cleaned everything with tack cloth again.

I decided to use a polyurethane spray to keep the original wood color, but just add a clean gloss. I sprayed the chair outside and let it dry according to the directions.

There were a few rough patches on the seat of the chair, so I went back with a very fine grit sandpaper and sanded again. This made a HUGE difference and the whole chair was smooth. Then I sprayed one more time and let it dry.

And here's my finished chair! I was so shocked that it matched my sewing desk perfectly!
I love it!
DSC01713
Katie's Nesting Spot

HookingupwithHoH
New Friend Fridays


Photobucket
A Little Knick Knack
Tidy Mom I'm Lovin It Fridays
Related Posts with Thumbnails