Showing posts with label bookshelf. Show all posts

Thursday, September 12, 2013

New Doors & Gallery Wall Reveal

This has been a 2 year project that has taken many, many hours more hours than we ever planned.  All we originally wanted to do was decorate the nursery when I found out I was pregnant and then it turned into an entire house makeover!

The original thought was just to update the 70s features of the house like the nasty, orange-y doors white 6-panel doors.


As usual, our plan quickly turned into a lot more work as we realized that we should probably put up new white trim too.  If we're going to replace doors, we should probably do all 26, plus some of them are custom sizes so they need to be ordered.  If we do 6-panel doors, we probably should get new closet doors too, right?  So that's 4 more closets to add to the list!

So if we're going to do all that work, we might as well just paint the main hallways upstairs to something pretty to make all those new white doors and trim stand out instead of that stark white that was there when we bought the house.

So because we do everything ourselves and never pay anyone to help, these projects take months...and months...and months!  Plus, we had a newborn...and then toddler to take care of at the same time.  We ended up chosing this pretty sage green for the hallway because we liked the way it made the white trim stand out, and it's wasn't too bold or boring.

My favorite part is at the end when I get to decorate!  Bare walls were just not cutting it and I looked for wall art that appealed to me for months.  So instead, I decided to do a family gallery wall with photos showing off my little guy.  He also LOVES to walk by and look at the photos, so it's a great way to help him learn to say the names of everyone in our family.

It took me a few months to gather enough frames from random thrift stores and clearance sections, and then I spraypainted and/or hand-painted them in several different colors.  (The whole color scheme took me way to long to decide on!)


The final result is so much brighter and more fun!
Instead of hanging the frames right on the wall, I chose to hang wall shelves so I could switch out the frames and move things around any time I wanted.


This is the 12 month baby collage form the photos I took every month of Connor's first year.  You can see more details here.


I'm still working on perfecting the area, but it's a great start compared to where we were a couple years ago!

Friday, October 8, 2010

Amazing Bookcase makeover

Yikes! This is even embarrassing to post!

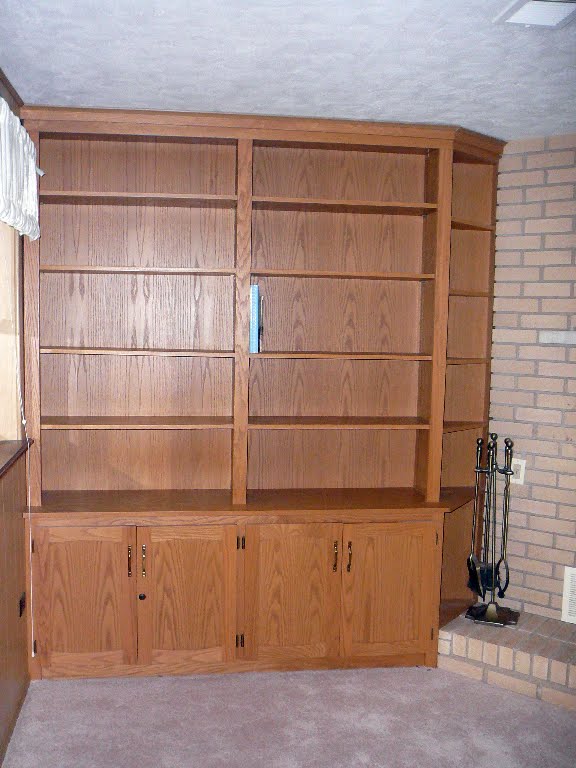
Here's our old family room built-in bookcase when we moved in last September. At first, we were going to rip it out entirely, but then we decided it was a great place for storage and we could probably transform it easily.

5 coats of paint and many days of frustration later, here's our painted cabinet.
The next huge task was filling the bookcase. It didn't seem like something too difficult, but once I started adding things, I realized how HUGE it was and how long it was going to take to fill it.

This is definitely a work in progress as I collect more accessories and books to add to it. I change up the little collections every few weeks when they start to bother me!
DSC01920

The Willow Tree angel collection was also a challenge. I was really into these in college and right after, but it got to the point where I had way too many and I didn't know what to do with them anymore. I put them in a box for a year and then pulled them back out for the bookcase. My randomly placing angels throughout the bookcase, it's not as overwhelming as the whole collection together.

And no, I'm not PG again. That's our angel from earlier this summer with the Willow Tree figurine my mom gave me the day of the surgery.
DSC01922

I chose to take the paper covers off all my books and only use hardcover books. I think it looks cleaner, but it also means it's going to take much longer to fill. I usually only buy paperback because I like to fold the books when I'm reading.
DSC01923

I also tried to keep with the color scheme of the room so all the photo frames match the other accessories in the room.
DSC01924

Some of the little accessories and bookends are from my spray paint extravaganza which you can read about here.
DSC01925

Big transformation, huh? We love it!

See the fun parties I'm linking up to here

Friday, July 9, 2010

Initial Frame Revamp

Team T's newest piece of art! See how I did it below!

I saw this hanging frame at the thrift store a few weeks ago for $2 and I knew it was perfect for an easy revamp.

I started out by taking out the insert and spray painting the outer frame red. Unfortunately, the paint didn't cover correctly and I got a funny texture. I tried to sand it off for a more antique look which is cool, but it doesn't match our style at all.
So my resolution was to cover the frame in this pretty textured paper!
I traced around the frame to get the size.
Then I cut out the paper and used spray glue to adhere it to the frame.
For the frame insert, I found this pretty damask paper.
Then I hot glued the wood letter to the frame.
Super easy and a big transformation!

Now I can't decide if I want to lean it on the mantle....
hang it on the wall...
or set it on a plate stand...
Linking up to:
New Friend Fridays
HookingupwithHoH


504 Main
Just a Girl's Show & Share Day
Frugalicious Friday

Tuesday, April 6, 2010

I think I'm obsessed...with spray paint

Filling up the bookcase in our family room is a lot more difficult than I thought.


I had boxes of knickknacks and frames sitting in the basement just screaming for a chance to come out. But once I started arranging things, I decided I wanted to stick with a color scheme to keep it from getting too busy.

I started collecting a few things that I thought could be painted to match and the spray painting began.

The more I sprayed, the more colors I wanted to buy.

The more I sprayed, the more I wanted to go out and find more stuff to spray.

And now at every store we go in to, I am constantly looking for cheap things to spray paint and transform.


Here's my spray-painting corner of the garage. Not very pretty, but it works.


And here's my first few transformations:

This fleur de lis bookend was 70 cents from TJmaxx. It looked like some of the paint has been scratched off, but I really like it, so I thought I'd try to fit it.

I did a very light spray with black paint and then used my nail to scratch off the edges and match the rest of the piece.
Super easy and now displayed on the bookcase!

This next piece was a ceramic cat I had from a sample sale a few years ago. I had a black cat (Princess) growing up, so I wanted to make this cat black to remind me of her.
After 4 coats of paint, she's done! She's going to look great holding some books up.
This bookend was $1 from TJMaxx, but the paint was chipping and one edge was broken.
I liked the weathered look, so I first spray painted with a dark red. Then I used a sponge sander to scratch off the top coat and let the black show through.
Once I put it up on the bookcase, it still looked a little dark, so I repeated the process with a fire engine red paint. This was the look I was going for.Many more spray painting projects already in the works!


Linking up to...
House of Hepworths
Just a Girl: Show & Share Day
Posh Pieces
Look at Me Party
Related Posts with Thumbnails